
本文是SpringBoot源码阅读计划的第五篇文章,本文简单解读一下内置的Servlet容器(tomcat)执行流程的源代码。
本文源码地址为:https://github.com/zouhuanli/MySpringBoot.git。
在普通的SpringMVC应用中,在”web.xml”配置DispatcherServlet和各种监听器,过滤器等组件。再启动Tomcat,由servlet容器Tomcat创建DispatcherServlet。
而在SpringBoot中,这些配置和组件是自动创建和配置,然后通过内置的Servlet容器启动,支持Tomcat、jetty、Undertow。
在项目中引入starter-web模块,里面引入了tomcat、web、webmvc等模块。
 <dependency>
      <groupId>org.springframework.boot</groupId>
      <artifactId>spring-boot-starter-tomcat</artifactId>
      <version>3.1.3</version>
      <scope>compile</scope>
    </dependency>
    <dependency>
      <groupId>org.springframework</groupId>
      <artifactId>spring-web</artifactId>
      <version>6.0.11</version>
      <scope>compile</scope>
    </dependency>
    <dependency>
      <groupId>org.springframework</groupId>
      <artifactId>spring-webmvc</artifactId>
      <version>6.0.11</version>
      <scope>compile</scope>
    </dependency>
一、简单使用
引入starter-web模块后,boot会自动引入相关依赖项,并配置好默认的DispatcherServlet,我们直接使用即可。
这里写一个简单的controller,如下。
@RestController
@RequestMapping("/user")
public class UserController {
    private static final Logger LOGGER = LoggerFactory.getLogger(UserController.class);
    @Autowired
    private UserService userService;

    @RequestMapping(value = "/add", method = RequestMethod.POST, produces = "application/json")
    public ResponseResult<User> add(@Valid @RequestBody User user, BindingResult bindingResult) {
        LOGGER.info("add method:{}", user);
        if (bindingResult.hasErrors()) {
            List<ObjectError> errors = bindingResult.getAllErrors();
            errors.forEach(p -> {
                FieldError fieldError = (FieldError) p;
                LOGGER.error("Invalid Parameter : object - {},field - {},errorMessage - {}", fieldError.getObjectName(), fieldError.getField(), fieldError.getDefaultMessage());
            });
            return ResponseResult.fail("invalid parameter");
        }
        userService.add(user);
        return ResponseResult.success(user);
    }

    @GetMapping("/listAll")
    public List<User> listAll() {
        LOGGER.info("listAll method");
        return userService.listAll();
    }


    @GetMapping("/get/{uid}")
    public User getByUid(@PathVariable("uid") Integer uid) {
        LOGGER.info("listAll method");
        return userService.getByUid(uid);
    }
}
然后设置tomcat的启动端口,’server.port’配置项在ServerProperties这个配置类。SpringBoot的配置一般是按前缀划分的,也就是说你随便写一个”aaa.cc.b’这样的配置boot框架自身是使用它没法自动配置的。
比如数据库配置的前缀’spring.datasource’,mybatis配置的前缀’mybatis.’,都是在对应的PropertiesBean内定义。
server:
  port: 8888
spring:
  config:
    import:
      - classpath:application-db.yml
直接启动应用,浏览器输入:http://localhost:8888/user/listAll 进行测试。返回:
[
  {
    "uid": -1909834037,
    "uname": "zouhl",
    "password": null,
    "gender": "M",
    "phone": "12345678901",
    "email": "test@gmail.com",
    "address": "阿巴阿巴",
    "age": null
  },
  {
    "uid": -1224581745,
    "uname": "zouhl",
    "password": null,
    "gender": "M",
    "phone": "12345678901",
    "email": "test@gmail.com",
    "address": "阿巴阿巴",
    "age": null
  },
  {
    "uid": -801153946,
    "uname": "zouhl",
    "password": null,
    "gender": "M",
    "phone": "12345678901",
    "email": "test@gmail.com",
    "address": "阿巴阿巴",
    "age": null
  },
  {
    "uid": -556398336,
    "uname": "zouhl",
    "password": null,
    "gender": "M",
    "phone": "12345678901",
    "email": "test@gmail.com",
    "address": "阿巴阿巴",
    "age": null
  },
  {
    "uid": 10000009,
    "uname": "李四",
    "password": null,
    "gender": null,
    "phone": null,
    "email": null,
    "address": null,
    "age": null
  }
]
可以看到通过SpringBoot集成Web功能启动Web项目是非常简单的,配置非常少,几乎没有XML配置。
WebMVC和tomcat的自动配置依然是通过XXXAutoConfiguration类来完成的。
二、自动配置
我们来到autoconfigure工程的web.servlet包内,可以看到主要有DispatcherServletAutoConfiguration、ServletWebServerFactoryAutoConfiguration、WebMvcAutoConfiguration。
这些自动配置类的实现原理请参考一下这篇文章:(自动配置实现原理)。
自动配置类的注册、创建和执行流程这里不做详细的解读,这里关注一下创建了哪些需要的组件。
ServletWebServerFactoryAutoConfiguration源码如下。
@AutoConfiguration(after = SslAutoConfiguration.class)
@AutoConfigureOrder(Ordered.HIGHEST_PRECEDENCE)
@ConditionalOnClass(ServletRequest.class)
@ConditionalOnWebApplication(type = Type.SERVLET)
@EnableConfigurationProperties(ServerProperties.class)
@Import({ ServletWebServerFactoryAutoConfiguration.BeanPostProcessorsRegistrar.class,
		ServletWebServerFactoryConfiguration.EmbeddedTomcat.class,
		ServletWebServerFactoryConfiguration.EmbeddedJetty.class,
		ServletWebServerFactoryConfiguration.EmbeddedUndertow.class })
public class ServletWebServerFactoryAutoConfiguration {
                                            //创建ServletWebServerFactoryCustomizer,定制化ServletWebServerFactory,
                                            // ServletWebServerFactory是用于创建Server(Tomcat、Jetty、Undertow)的工厂类
	@Bean
	public ServletWebServerFactoryCustomizer servletWebServerFactoryCustomizer(ServerProperties serverProperties,
			ObjectProvider<WebListenerRegistrar> webListenerRegistrars,
			ObjectProvider<CookieSameSiteSupplier> cookieSameSiteSuppliers, ObjectProvider<SslBundles> sslBundles) {
		return new ServletWebServerFactoryCustomizer(serverProperties, webListenerRegistrars.orderedStream().toList(),
				cookieSameSiteSuppliers.orderedStream().toList(), sslBundles.getIfAvailable());
	}

	@Bean
	@ConditionalOnClass(name = "org.apache.catalina.startup.Tomcat")
	public TomcatServletWebServerFactoryCustomizer tomcatServletWebServerFactoryCustomizer(
			ServerProperties serverProperties) {
		return new TomcatServletWebServerFactoryCustomizer(serverProperties);
	}

	@Configuration(proxyBeanMethods = false)
	@ConditionalOnProperty(value = "server.forward-headers-strategy", havingValue = "framework")
	@ConditionalOnMissingFilterBean(ForwardedHeaderFilter.class)
	static class ForwardedHeaderFilterConfiguration {

		@Bean
		@ConditionalOnClass(name = "org.apache.catalina.startup.Tomcat")
		ForwardedHeaderFilterCustomizer tomcatForwardedHeaderFilterCustomizer(ServerProperties serverProperties) {
			return (filter) -> filter.setRelativeRedirects(serverProperties.getTomcat().isUseRelativeRedirects());
		}

		@Bean
		FilterRegistrationBean<ForwardedHeaderFilter> forwardedHeaderFilter(
				ObjectProvider<ForwardedHeaderFilterCustomizer> customizerProvider) {
			ForwardedHeaderFilter filter = new ForwardedHeaderFilter();
			customizerProvider.ifAvailable((customizer) -> customizer.customize(filter));
			FilterRegistrationBean<ForwardedHeaderFilter> registration = new FilterRegistrationBean<>(filter);
			registration.setDispatcherTypes(DispatcherType.REQUEST, DispatcherType.ASYNC, DispatcherType.ERROR);
			registration.setOrder(Ordered.HIGHEST_PRECEDENCE);
			return registration;
		}

	}

	interface ForwardedHeaderFilterCustomizer {

		void customize(ForwardedHeaderFilter filter);

	}

	/**
	 * Registers a {@link WebServerFactoryCustomizerBeanPostProcessor}. Registered via
	 * {@link ImportBeanDefinitionRegistrar} for early registration.
	 */
                                //通过BeanPostProcessorsRegistrar注册额外的Bean信息
	public static class BeanPostProcessorsRegistrar implements ImportBeanDefinitionRegistrar, BeanFactoryAware {

		private ConfigurableListableBeanFactory beanFactory;

		@Override
		public void setBeanFactory(BeanFactory beanFactory) throws BeansException {
			if (beanFactory instanceof ConfigurableListableBeanFactory listableBeanFactory) {
				this.beanFactory = listableBeanFactory;
			}
		}

		@Override
		public void registerBeanDefinitions(AnnotationMetadata importingClassMetadata,
				BeanDefinitionRegistry registry) {
			if (this.beanFactory == null) {
				return;
			}
			registerSyntheticBeanIfMissing(registry, "webServerFactoryCustomizerBeanPostProcessor",
					WebServerFactoryCustomizerBeanPostProcessor.class);
			registerSyntheticBeanIfMissing(registry, "errorPageRegistrarBeanPostProcessor",
					ErrorPageRegistrarBeanPostProcessor.class);
		}

		private <T> void registerSyntheticBeanIfMissing(BeanDefinitionRegistry registry, String name,
				Class<T> beanClass) {
			if (ObjectUtils.isEmpty(this.beanFactory.getBeanNamesForType(beanClass, true, false))) {
				RootBeanDefinition beanDefinition = new RootBeanDefinition(beanClass);
				beanDefinition.setSynthetic(true);
				registry.registerBeanDefinition(name, beanDefinition);
			}
		}

	}

}
可以看到这里主要是创建ServletWebServerFactory的定制化器。
继续看下这个类ServletWebServerFactory的源码。
public class TomcatServletWebServerFactory extends AbstractServletWebServerFactory
		implements ConfigurableTomcatWebServerFactory, ResourceLoaderAware {


                    //创建WebServer
    @Override
    public WebServer getWebServer(ServletContextInitializer... initializers) {
        if (this.disableMBeanRegistry) {
            Registry.disableRegistry();
        }
        Tomcat tomcat = new Tomcat();
        File baseDir = (this.baseDirectory != null) ? this.baseDirectory : createTempDir("tomcat");
        tomcat.setBaseDir(baseDir.getAbsolutePath());
        for (LifecycleListener listener : this.serverLifecycleListeners) {
            tomcat.getServer().addLifecycleListener(listener);
        }
        Connector connector = new Connector(this.protocol);
        connector.setThrowOnFailure(true);
        tomcat.getService().addConnector(connector);
        customizeConnector(connector);
        tomcat.setConnector(connector);
        tomcat.getHost().setAutoDeploy(false);
        configureEngine(tomcat.getEngine());
        for (Connector additionalConnector : this.additionalTomcatConnectors) {
            tomcat.getService().addConnector(additionalConnector);
        }
        prepareContext(tomcat.getHost(), initializers);
        return getTomcatWebServer(tomcat);
    }
}
这里创建的WebServer有Tomcat、Jetty、Undertow三类。
我们继续进入ServletWebServerFactoryConfiguration这个配置类。
@Configuration(proxyBeanMethods = false)
class ServletWebServerFactoryConfiguration {

	@Configuration(proxyBeanMethods = false)
	@ConditionalOnClass({ Servlet.class, Tomcat.class, UpgradeProtocol.class })
	@ConditionalOnMissingBean(value = ServletWebServerFactory.class, search = SearchStrategy.CURRENT)
	static class EmbeddedTomcat {
                        //在这里创建TomcatServletWebServerFactory对象,用以创建TomcatWebServer
		@Bean
		TomcatServletWebServerFactory tomcatServletWebServerFactory(
				ObjectProvider<TomcatConnectorCustomizer> connectorCustomizers,
				ObjectProvider<TomcatContextCustomizer> contextCustomizers,
				ObjectProvider<TomcatProtocolHandlerCustomizer<?>> protocolHandlerCustomizers) {
			TomcatServletWebServerFactory factory = new TomcatServletWebServerFactory();
			factory.getTomcatConnectorCustomizers().addAll(connectorCustomizers.orderedStream().toList());
			factory.getTomcatContextCustomizers().addAll(contextCustomizers.orderedStream().toList());
			factory.getTomcatProtocolHandlerCustomizers().addAll(protocolHandlerCustomizers.orderedStream().toList());
			return factory;
		}

	}

	/**
	 * Nested configuration if Jetty is being used.
	 */
	@Configuration(proxyBeanMethods = false)
	@ConditionalOnClass({ Servlet.class, Server.class, Loader.class, WebAppContext.class })
	@ConditionalOnMissingBean(value = ServletWebServerFactory.class, search = SearchStrategy.CURRENT)
	static class EmbeddedJetty {

		@Bean
		JettyServletWebServerFactory jettyServletWebServerFactory(
				ObjectProvider<JettyServerCustomizer> serverCustomizers) {
			JettyServletWebServerFactory factory = new JettyServletWebServerFactory();
			factory.getServerCustomizers().addAll(serverCustomizers.orderedStream().toList());
			return factory;
		}

	}

	/**
	 * Nested configuration if Undertow is being used.
	 */
	@Configuration(proxyBeanMethods = false)
	@ConditionalOnClass({ Servlet.class, Undertow.class, SslClientAuthMode.class })
	@ConditionalOnMissingBean(value = ServletWebServerFactory.class, search = SearchStrategy.CURRENT)
	static class EmbeddedUndertow {

		@Bean
		UndertowServletWebServerFactory undertowServletWebServerFactory(
				ObjectProvider<UndertowDeploymentInfoCustomizer> deploymentInfoCustomizers,
				ObjectProvider<UndertowBuilderCustomizer> builderCustomizers) {
			UndertowServletWebServerFactory factory = new UndertowServletWebServerFactory();
			factory.getDeploymentInfoCustomizers().addAll(deploymentInfoCustomizers.orderedStream().toList());
			factory.getBuilderCustomizers().addAll(builderCustomizers.orderedStream().toList());
			return factory;
		}

		@Bean
		UndertowServletWebServerFactoryCustomizer undertowServletWebServerFactoryCustomizer(
				ServerProperties serverProperties) {
			return new UndertowServletWebServerFactoryCustomizer(serverProperties);
		}

	}

}
可以看到,三类WebServerFactory用到创建对应WebServer实例。
我们再来到EmbeddedWebServerFactoryCustomizerAutoConfiguration这个自动配置类。
@AutoConfiguration
@ConditionalOnNotWarDeployment
@ConditionalOnWebApplication
@EnableConfigurationProperties(ServerProperties.class)
public class EmbeddedWebServerFactoryCustomizerAutoConfiguration {

    /**
     * Nested configuration if Tomcat is being used.
     */
    @Configuration(proxyBeanMethods = false)
    @ConditionalOnClass({ Tomcat.class, UpgradeProtocol.class })
    public static class TomcatWebServerFactoryCustomizerConfiguration {
                              //这里创建TomcatWebServerFactoryCustomizer,用于定制化TomcatWebServerFactory
        @Bean
        public TomcatWebServerFactoryCustomizer tomcatWebServerFactoryCustomizer(Environment environment,
                                                                                 ServerProperties serverProperties) {
            return new TomcatWebServerFactoryCustomizer(environment, serverProperties);
        }

    }
}
我们继续看下TomcatWebServerFactoryCustomizer#customize方法。
                     //定制化参数,从而作用于WebServer
@Override
	public void customize(ConfigurableTomcatWebServerFactory factory) {
		ServerProperties.Tomcat properties = this.serverProperties.getTomcat();
		PropertyMapper map = PropertyMapper.get().alwaysApplyingWhenNonNull();
		map.from(properties::getBasedir).to(factory::setBaseDirectory);
		map.from(properties::getBackgroundProcessorDelay)
			.as(Duration::getSeconds)
			.as(Long::intValue)
			.to(factory::setBackgroundProcessorDelay);
		customizeRemoteIpValve(factory);
		ServerProperties.Tomcat.Threads threadProperties = properties.getThreads();
		map.from(threadProperties::getMax)
			.when(this::isPositive)
			.to((maxThreads) -> customizeMaxThreads(factory, threadProperties.getMax()));
		map.from(threadProperties::getMinSpare)
			.when(this::isPositive)
			.to((minSpareThreads) -> customizeMinThreads(factory, minSpareThreads));
		map.from(this.serverProperties.getMaxHttpRequestHeaderSize())
			.asInt(DataSize::toBytes)
			.when(this::isPositive)
			.to((maxHttpRequestHeaderSize) -> customizeMaxHttpRequestHeaderSize(factory, maxHttpRequestHeaderSize));
		map.from(properties::getMaxHttpResponseHeaderSize)
			.asInt(DataSize::toBytes)
			.when(this::isPositive)
			.to((maxHttpResponseHeaderSize) -> customizeMaxHttpResponseHeaderSize(factory, maxHttpResponseHeaderSize));
		map.from(properties::getMaxSwallowSize)
			.asInt(DataSize::toBytes)
			.to((maxSwallowSize) -> customizeMaxSwallowSize(factory, maxSwallowSize));
		map.from(properties::getMaxHttpFormPostSize)
			.asInt(DataSize::toBytes)
			.when((maxHttpFormPostSize) -> maxHttpFormPostSize != 0)
			.to((maxHttpFormPostSize) -> customizeMaxHttpFormPostSize(factory, maxHttpFormPostSize));
		map.from(properties::getAccesslog)
			.when(ServerProperties.Tomcat.Accesslog::isEnabled)
			.to((enabled) -> customizeAccessLog(factory));
		map.from(properties::getUriEncoding).to(factory::setUriEncoding);
		map.from(properties::getConnectionTimeout)
			.to((connectionTimeout) -> customizeConnectionTimeout(factory, connectionTimeout));
		map.from(properties::getMaxConnections)
			.when(this::isPositive)
			.to((maxConnections) -> customizeMaxConnections(factory, maxConnections));
		map.from(properties::getAcceptCount)
			.when(this::isPositive)
			.to((acceptCount) -> customizeAcceptCount(factory, acceptCount));
		map.from(properties::getProcessorCache)
			.to((processorCache) -> customizeProcessorCache(factory, processorCache));
		map.from(properties::getKeepAliveTimeout)
			.to((keepAliveTimeout) -> customizeKeepAliveTimeout(factory, keepAliveTimeout));
		map.from(properties::getMaxKeepAliveRequests)
			.to((maxKeepAliveRequests) -> customizeMaxKeepAliveRequests(factory, maxKeepAliveRequests));
		map.from(properties::getRelaxedPathChars)
			.as(this::joinCharacters)
			.whenHasText()
			.to((relaxedChars) -> customizeRelaxedPathChars(factory, relaxedChars));
		map.from(properties::getRelaxedQueryChars)
			.as(this::joinCharacters)
			.whenHasText()
			.to((relaxedChars) -> customizeRelaxedQueryChars(factory, relaxedChars));
		map.from(properties::isRejectIllegalHeader)
			.to((rejectIllegalHeader) -> customizeRejectIllegalHeader(factory, rejectIllegalHeader));
		customizeStaticResources(factory);
		customizeErrorReportValve(this.serverProperties.getError(), factory);
	}
这个方法用于定制化WebServer的参数。
最后来到DispatcherServletAutoConfiguration这个自动配置类。
@AutoConfigureOrder(Ordered.HIGHEST_PRECEDENCE)
@AutoConfiguration(after = ServletWebServerFactoryAutoConfiguration.class)
@ConditionalOnWebApplication(type = Type.SERVLET)
@ConditionalOnClass(DispatcherServlet.class)
public class DispatcherServletAutoConfiguration {

	/**
	 * The bean name for a DispatcherServlet that will be mapped to the root URL "/".
	 */
	public static final String DEFAULT_DISPATCHER_SERVLET_BEAN_NAME = "dispatcherServlet";

	/**
	 * The bean name for a ServletRegistrationBean for the DispatcherServlet "/".
	 */
	public static final String DEFAULT_DISPATCHER_SERVLET_REGISTRATION_BEAN_NAME = "dispatcherServletRegistration";

	@Configuration(proxyBeanMethods = false)
	@Conditional(DefaultDispatcherServletCondition.class)
	@ConditionalOnClass(ServletRegistration.class)
	@EnableConfigurationProperties(WebMvcProperties.class)
	protected static class DispatcherServletConfiguration {
                        //这里创建了DispatcherServlet,依赖于WebMvcProperties这个PropertiesBean去读取WebMvc的配置
		@Bean(name = DEFAULT_DISPATCHER_SERVLET_BEAN_NAME)
		public DispatcherServlet dispatcherServlet(WebMvcProperties webMvcProperties) {
			DispatcherServlet dispatcherServlet = new DispatcherServlet();
			dispatcherServlet.setDispatchOptionsRequest(webMvcProperties.isDispatchOptionsRequest());
			dispatcherServlet.setDispatchTraceRequest(webMvcProperties.isDispatchTraceRequest());
			dispatcherServlet.setThrowExceptionIfNoHandlerFound(webMvcProperties.isThrowExceptionIfNoHandlerFound());
			dispatcherServlet.setPublishEvents(webMvcProperties.isPublishRequestHandledEvents());
			dispatcherServlet.setEnableLoggingRequestDetails(webMvcProperties.isLogRequestDetails());
			return dispatcherServlet;
		}

		@Bean
		@ConditionalOnBean(MultipartResolver.class)
		@ConditionalOnMissingBean(name = DispatcherServlet.MULTIPART_RESOLVER_BEAN_NAME)
		public MultipartResolver multipartResolver(MultipartResolver resolver) {
			// Detect if the user has created a MultipartResolver but named it incorrectly
			return resolver;
		}

	}

	@Configuration(proxyBeanMethods = false)
	@Conditional(DispatcherServletRegistrationCondition.class)
	@ConditionalOnClass(ServletRegistration.class)
	@EnableConfigurationProperties(WebMvcProperties.class)
	@Import(DispatcherServletConfiguration.class)
	protected static class DispatcherServletRegistrationConfiguration {
                    //这里创建DispatcherServletRegistrationBean 是DispatcherServlet的包装修饰类。
		@Bean(name = DEFAULT_DISPATCHER_SERVLET_REGISTRATION_BEAN_NAME)
		@ConditionalOnBean(value = DispatcherServlet.class, name = DEFAULT_DISPATCHER_SERVLET_BEAN_NAME)
		public DispatcherServletRegistrationBean dispatcherServletRegistration(DispatcherServlet dispatcherServlet,
				WebMvcProperties webMvcProperties, ObjectProvider<MultipartConfigElement> multipartConfig) {
			DispatcherServletRegistrationBean registration = new DispatcherServletRegistrationBean(dispatcherServlet,
					webMvcProperties.getServlet().getPath());
			registration.setName(DEFAULT_DISPATCHER_SERVLET_BEAN_NAME);
			registration.setLoadOnStartup(webMvcProperties.getServlet().getLoadOnStartup());
			multipartConfig.ifAvailable(registration::setMultipartConfig);
			return registration;
		}

	}
到这里,主要的组件和配置都已经创建完成了。下面重点解读一下内置Servlet容器(Tomcat)的启动流程。
三、启动过程
3.1 SpringApplication的run方法
再次来到SpringApplication#run方法。
public ConfigurableApplicationContext run(String... args) {
		long startTime = System.nanoTime();
		DefaultBootstrapContext bootstrapContext = createBootstrapContext();
		ConfigurableApplicationContext context = null;
		configureHeadlessProperty();
		SpringApplicationRunListeners listeners = getRunListeners(args);
		listeners.starting(bootstrapContext, this.mainApplicationClass);
		try {
			ApplicationArguments applicationArguments = new DefaultApplicationArguments(args);
			ConfigurableEnvironment environment = prepareEnvironment(listeners, bootstrapContext, applicationArguments);
			Banner printedBanner = printBanner(environment);
                                         //创建ApplicationContext,这里是AnnotationConfigServletWebServerApplicationContext。不引入web时候一般是AnnotationConfigApplicationContext。
			context = createApplicationContext();
			context.setApplicationStartup(this.applicationStartup);
			prepareContext(bootstrapContext, context, environment, listeners, applicationArguments, printedBanner);
			                            //刷新容器,进入这个方法
            refreshContext(context);
			afterRefresh(context, applicationArguments);
			Duration timeTakenToStartup = Duration.ofNanos(System.nanoTime() - startTime);
			if (this.logStartupInfo) {
				new StartupInfoLogger(this.mainApplicationClass).logStarted(getApplicationLog(), timeTakenToStartup);
			}
			listeners.started(context, timeTakenToStartup);
			callRunners(context, applicationArguments);
		}
		catch (Throwable ex) {
			if (ex instanceof AbandonedRunException) {
				throw ex;
			}
			handleRunFailure(context, ex, listeners);
			throw new IllegalStateException(ex);
		}
		try {
			if (context.isRunning()) {
				Duration timeTakenToReady = Duration.ofNanos(System.nanoTime() - startTime);
				listeners.ready(context, timeTakenToReady);
			}
		}
		catch (Throwable ex) {
			if (ex instanceof AbandonedRunException) {
				throw ex;
			}
			handleRunFailure(context, ex, null);
			throw new IllegalStateException(ex);
		}
		return context;
	}
refresh方法见过很多次了。
@Override
	public void refresh() throws BeansException, IllegalStateException {
		synchronized (this.startupShutdownMonitor) {
			StartupStep contextRefresh = this.applicationStartup.start("spring.context.refresh");

			// Prepare this context for refreshing.
			prepareRefresh();

			// Tell the subclass to refresh the internal bean factory.
			ConfigurableListableBeanFactory beanFactory = obtainFreshBeanFactory();

			// Prepare the bean factory for use in this context.
			prepareBeanFactory(beanFactory);

			try {
				// Allows post-processing of the bean factory in context subclasses.
				postProcessBeanFactory(beanFactory);

				StartupStep beanPostProcess = this.applicationStartup.start("spring.context.beans.post-process");
				// Invoke factory processors registered as beans in the context.
				invokeBeanFactoryPostProcessors(beanFactory);

				// Register bean processors that intercept bean creation.
				registerBeanPostProcessors(beanFactory);
				beanPostProcess.end();

				// Initialize message source for this context.
				initMessageSource();

				// Initialize event multicaster for this context.
				initApplicationEventMulticaster();

				// Initialize other special beans in specific context subclasses.
                                            //钩子方法,进入这个方法
				onRefresh();

				// Check for listener beans and register them.
				registerListeners();

				// Instantiate all remaining (non-lazy-init) singletons.
				finishBeanFactoryInitialization(beanFactory);

				// Last step: publish corresponding event.
				finishRefresh();
			}

			catch (BeansException ex) {
				if (logger.isWarnEnabled()) {
					logger.warn("Exception encountered during context initialization - " +
							"cancelling refresh attempt: " + ex);
				}

				// Destroy already created singletons to avoid dangling resources.
				destroyBeans();

				// Reset 'active' flag.
				cancelRefresh(ex);

				// Propagate exception to caller.
				throw ex;
			}

			finally {
				// Reset common introspection caches in Spring's core, since we
				// might not ever need metadata for singleton beans anymore...
				resetCommonCaches();
				contextRefresh.end();
			}
		}
	}
来到ServletWebServerApplicationContext#onrefresh方法。
@Override
protected void onRefresh() {
        super.onRefresh();
        try {
            //创建WebServer,默认是Tomcat的
        createWebServer();
        }
        catch (Throwable ex) {
        throw new ApplicationContextException("Unable to start web server", ex);
        }
        }
3.2 创建Server
进入创建Server的方法。
private void createWebServer() {
		WebServer webServer = this.webServer;
		ServletContext servletContext = getServletContext();
		if (webServer == null && servletContext == null) {
			StartupStep createWebServer = getApplicationStartup().start("spring.boot.webserver.create");
                                        //创建ServletWebServerFactory的Bean,上面已经创建了TomcatServletWebServerFactory,这里直接就是getbean获取。
			ServletWebServerFactory factory = getWebServerFactory();
			createWebServer.tag("factory", factory.getClass().toString());
                                    // 执行ServletContextInitializer的onStartup这个监听方法。
                                     //注意重点看这行代码.创建WebServer(Tomcat),启动Servlet容器,默认是Tomcat
			this.webServer = factory.getWebServer(getSelfInitializer());
			createWebServer.end();
			getBeanFactory().registerSingleton("webServerGracefulShutdown",
					new WebServerGracefulShutdownLifecycle(this.webServer));
			getBeanFactory().registerSingleton("webServerStartStop",
					new WebServerStartStopLifecycle(this, this.webServer));
		}
		else if (servletContext != null) {
			try {
				getSelfInitializer().onStartup(servletContext);
			}
			catch (ServletException ex) {
				throw new ApplicationContextException("Cannot initialize servlet context", ex);
			}
		}
		initPropertySources();
	}
而selfInitialize如下,允许在创建WebServer的时候执行onStartup监听方法,阅读ServletContextInitializer可以了解到:这个方法主要用于创建Servlet、Filter、Listener。
private void selfInitialize(ServletContext servletContext) throws ServletException {
		prepareWebApplicationContext(servletContext);
		registerApplicationScope(servletContext);
		WebApplicationContextUtils.registerEnvironmentBeans(getBeanFactory(), servletContext);
		for (ServletContextInitializer beans : getServletContextInitializerBeans()) {
			beans.onStartup(servletContext);
		}
	}
再回到TomcatServletWebServerFactory#getWebServer方法。
@Override
	public WebServer getWebServer(ServletContextInitializer... initializers) {
		if (this.disableMBeanRegistry) {
			Registry.disableRegistry();
		}
                            //创建Tomcat
		Tomcat tomcat = new Tomcat();
		File baseDir = (this.baseDirectory != null) ? this.baseDirectory : createTempDir("tomcat");
		tomcat.setBaseDir(baseDir.getAbsolutePath());
                            //添加监听器
		for (LifecycleListener listener : this.serverLifecycleListeners) {
			tomcat.getServer().addLifecycleListener(listener);
		}
		Connector connector = new Connector(this.protocol);
		connector.setThrowOnFailure(true);
		tomcat.getService().addConnector(connector);
		customizeConnector(connector);
		tomcat.setConnector(connector);
		tomcat.getHost().setAutoDeploy(false);
		configureEngine(tomcat.getEngine());
		for (Connector additionalConnector : this.additionalTomcatConnectors) {
			tomcat.getService().addConnector(additionalConnector);
		}
		prepareContext(tomcat.getHost(), initializers);
                        //注意此行代码
		return getTomcatWebServer(tomcat);
	}
再进入TomcatWebServer的构造器。
public TomcatWebServer(Tomcat tomcat, boolean autoStart, Shutdown shutdown) {
		Assert.notNull(tomcat, "Tomcat Server must not be null");
		this.tomcat = tomcat;
		this.autoStart = autoStart;
		this.gracefulShutdown = (shutdown == Shutdown.GRACEFUL) ? new GracefulShutdown(tomcat) : null;
                        //初始化
		initialize();
	}
初始化方法内启动Tomcat。
private void initialize() throws WebServerException {
		logger.info("Tomcat initialized with port(s): " + getPortsDescription(false));
		synchronized (this.monitor) {
			try {
				addInstanceIdToEngineName();

				Context context = findContext();
				context.addLifecycleListener((event) -> {
					if (context.equals(event.getSource()) && Lifecycle.START_EVENT.equals(event.getType())) {
						// Remove service connectors so that protocol binding doesn't
						// happen when the service is started.
						removeServiceConnectors();
					}
				});

				// Start the server to trigger initialization listeners
                            //启动tomcat
				this.tomcat.start();

				// We can re-throw failure exception directly in the main thread
				rethrowDeferredStartupExceptions();

				try {
					ContextBindings.bindClassLoader(context, context.getNamingToken(), getClass().getClassLoader());
				}
				catch (NamingException ex) {
					// Naming is not enabled. Continue
				}

				// Unlike Jetty, all Tomcat threads are daemon threads. We create a
				// blocking non-daemon to stop immediate shutdown
                        //创建等待线程
				startDaemonAwaitThread();
			}
			catch (Exception ex) {
				stopSilently();
				destroySilently();
				throw new WebServerException("Unable to start embedded Tomcat", ex);
			}
		}
	}
到这,TomcatServer就创建并启动了。
四、注册Servlet组件的相关注解(@ServletComponentScan、@WebServlet、@WebFilter以及@WebListener)的解读
4.1 简单使用
@ServletComponentScan、@WebServlet、@WebFilter以及@WebListener等注解用以添加Serlet、过滤器、监听器。
@WebServlet、@WebFilter以及@WebListener这三个注解并不是spring自身的,而是来自JakartaEE的,@ServletComponentScan用于扫描这三个注解注册的Servlet、过滤器、监听器。
先看个简单的示例:
自定义Servlet。
@WebServlet(urlPatterns = "/simple")
public class MySimpleServlet extends HttpServlet {
    private static final Logger LOGGER = LoggerFactory.getLogger(MySimpleServlet.class);

    public void service(HttpServletRequest req, HttpServletResponse resp) throws ServletException, IOException {
        LOGGER.info("MySimpleServlet.service()");
        resp.getWriter().write("Hello,World!");
    }
}
创建过滤器。
@WebFilter(urlPatterns = "/*")
public class MyFilter  extends HttpFilter {
    private static final Logger LOGGER = LoggerFactory.getLogger(MyFilter.class);

    /**
     * @param req   a {@link ServletRequest} object that contains the request the client has made of the filter
     * @param res   a {@link ServletResponse} object that contains the response the filter sends to the client
     * @param chain the <code>FilterChain</code> for invoking the next filter or the resource
     * @throws IOException
     * @throws ServletException
     */
    @Override
    public void doFilter(ServletRequest req, ServletResponse res, FilterChain chain)
            throws IOException, ServletException {
        if (!(req instanceof HttpServletRequest && res instanceof HttpServletResponse)) {
            throw new ServletException("non-HTTP request or response");
        }
        beforeDo(req);
        chain.doFilter(req, res);
        afterDo(req, res);
    }

    /**
     * 前置处理
     * @param req
     * @param res
     */
    private void afterDo(ServletRequest req, ServletResponse res) {
        LOGGER.info(")MyFilter.afterDo(");
    }

    /**
     * 后置处理
     * @param req
     */
    private void beforeDo(ServletRequest req) {
        LOGGER.info("MyFilter.beforeDo()");
    }

}
创建监听器。
@WebListener(value = "MyListener")
public class MyListener implements ServletContextListener {
    private static final Logger LOGGER = LoggerFactory.getLogger(MyListener.class);

    /**
     * * Notification that the web application initialization process is starting. All ServletContextListeners are
     * notified of context initialization before any filter or servlet in the web application is initialized. The
     * default implementation is a NO-OP.
     *
     * @param sce Information about the ServletContext that was initialized
     */
    @Override
    public void contextInitialized(ServletContextEvent sce) {
        LOGGER.info("MyListener.contextInitialized()");
    }

    /**
     * * Notification that the servlet context is about to be shut down. All servlets and filters have been destroyed
     * before any ServletContextListeners are notified of context destruction. The default implementation is a NO-OP.
     *
     * @param sce Information about the ServletContext that was destroyed
     */
    @Override
    public void contextDestroyed(ServletContextEvent sce) {
        LOGGER.info("MyListener.contextDestroyed()");
    }
}
启动应用,执行测试。
POST  http://localhost:8888/simple   HTTP/1.1
content-type: text/plain;charset: utf-8

1233aabaaaaaa1123
执行结果:
2023-11-05 18:40:33,682|INFO |         MyListener.java:22  |main|MyListener.contextInitialized()
2023-11-05 18:40:33,917|INFO |       DirectJDKLog.java:173 |main|Starting ProtocolHandler ["http-nio-8888"]
2023-11-05 18:40:33,935|INFO |    TomcatWebServer.java:220 |main|Tomcat started on port(s): 8888 (http) with context path ''
2023-11-05 18:40:33,940|INFO |  StartupInfoLogger.java:57  |main|Started MySpringBootApplication in 0.962 seconds (process running for 1.36)
2023-11-05 18:40:43,631|INFO |           MyFilter.java:52  |http-nio-8888-exec-1|MyFilter.beforeDo()
2023-11-05 18:40:43,631|INFO |    MySimpleServlet.java:18  |http-nio-8888-exec-1|MySimpleServlet.service()
2023-11-05 18:40:43,632|INFO |           MyFilter.java:44  |http-nio-8888-exec-1|)MyFilter.afterDo(
4.2 注册流程
4.2.1 Bean注册流程
首先ServletComponentScan注解引入了ServletComponentScanRegistrar,ServletComponentScanRegistrar内部注册了ServletComponentRegisteringPostProcessor。
@Import(ServletComponentScanRegistrar.class)
public @interface ServletComponentScan {
    //......
}
ServletComponentScanRegistrar#addPostProcessor方法。
private void addPostProcessor(BeanDefinitionRegistry registry, Set<String> packagesToScan) {
		ServletComponentRegisteringPostProcessorBeanDefinition definition = new ServletComponentRegisteringPostProcessorBeanDefinition(
				packagesToScan);
		registry.registerBeanDefinition(BEAN_NAME, definition);
	}

static final class ServletComponentRegisteringPostProcessorBeanDefinition extends GenericBeanDefinition {

    private final Set<String> packageNames = new LinkedHashSet<>();

    ServletComponentRegisteringPostProcessorBeanDefinition(Collection<String> packageNames) {
        setBeanClass(ServletComponentRegisteringPostProcessor.class);
        setRole(BeanDefinition.ROLE_INFRASTRUCTURE);
        addPackageNames(packageNames);
    }

    @Override
    public Supplier<?> getInstanceSupplier() {
        return () -> new ServletComponentRegisteringPostProcessor(this.packageNames);
    }

    private void addPackageNames(Collection<String> additionalPackageNames) {
        this.packageNames.addAll(additionalPackageNames);
    }

}
ServletComponentRegisteringPostProcessor是一个BeanFactoryPostProcessor,在AbstractApplicationContext#invokeBeanFactoryPostProcessors作为入口,注册额外的bean信息。
这里是扫描注册路径,把Servlet、过滤器、监听器的Bean信息注册到容器。
	private void scanPackage(ClassPathScanningCandidateComponentProvider componentProvider, String packageToScan) {
		for (BeanDefinition candidate : componentProvider.findCandidateComponents(packageToScan)) {
			if (candidate instanceof AnnotatedBeanDefinition annotatedBeanDefinition) {
				for (ServletComponentHandler handler : HANDLERS) {
					handler.handle(annotatedBeanDefinition, (BeanDefinitionRegistry) this.applicationContext);
				}
			}
		}
	}
如WebFilterHandler注册过滤器的Bean信息:
	@Override
	public void doHandle(Map<String, Object> attributes, AnnotatedBeanDefinition beanDefinition,
			BeanDefinitionRegistry registry) {
		BeanDefinitionBuilder builder = BeanDefinitionBuilder.rootBeanDefinition(FilterRegistrationBean.class);
		builder.addPropertyValue("asyncSupported", attributes.get("asyncSupported"));
		builder.addPropertyValue("dispatcherTypes", extractDispatcherTypes(attributes));
		builder.addPropertyValue("filter", beanDefinition);
		builder.addPropertyValue("initParameters", extractInitParameters(attributes));
		String name = determineName(attributes, beanDefinition);
		builder.addPropertyValue("name", name);
		builder.addPropertyValue("servletNames", attributes.get("servletNames"));
		builder.addPropertyValue("urlPatterns", extractUrlPatterns(attributes));
		registry.registerBeanDefinition(name, builder.getBeanDefinition());
	}
到这里这三个注解注册的Bean信息就注册到容器中里了,由Spring容器创建对应的Bean实例。
4.2.2 注册为Servlet组件的注册流程
有了这三种组件的Bean实例,如何注册为Servlet组件呢?
在«SpringBoot启动流程»这篇文章中,跟踪SpringBoot启动流程中来到这行代码:
this.webServer = factory.getWebServer(getSelfInitializer());
然后来到ServletContextInitializer初始化器起作用的这个方法。
private void selfInitialize(ServletContext servletContext) throws ServletException {
		prepareWebApplicationContext(servletContext);
		registerApplicationScope(servletContext);
		WebApplicationContextUtils.registerEnvironmentBeans(getBeanFactory(), servletContext);
		for (ServletContextInitializer beans : getServletContextInitializerBeans()) {
			beans.onStartup(servletContext);
		}
	}
先看一下ServletContextInitializer的类关系图。
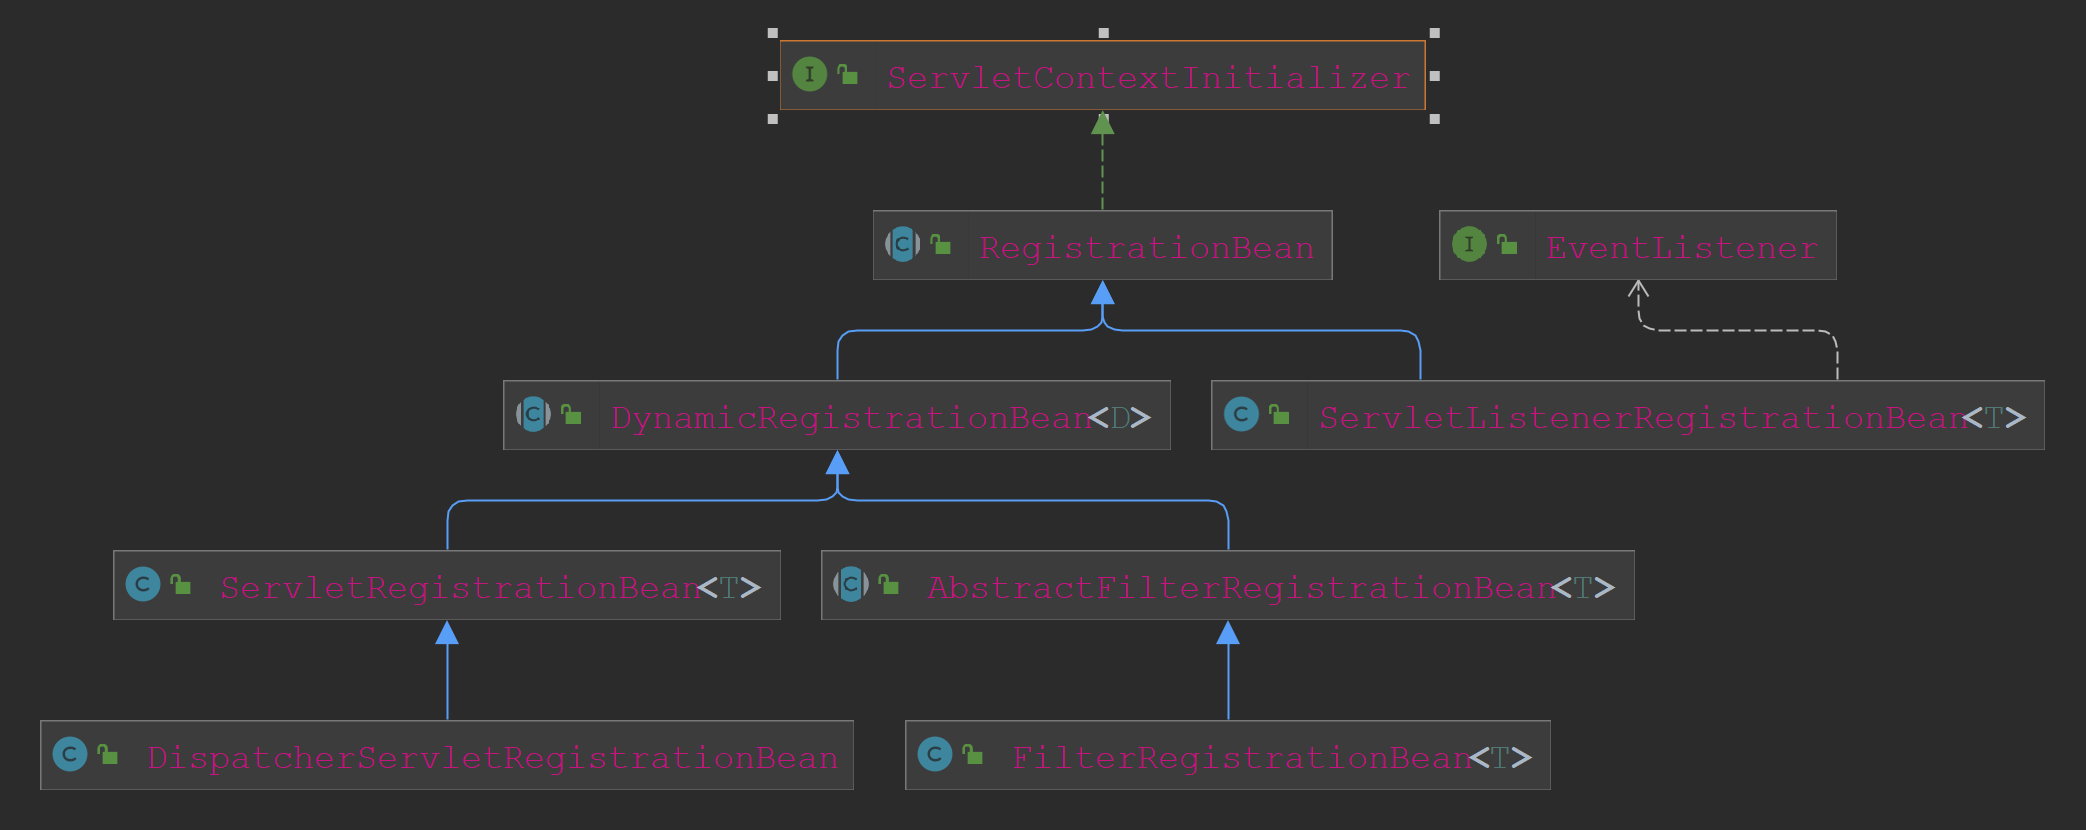
看这个图应该可以了解到这个接口主要用以注册Servlet、Filter、Listener这三类组件。
首先ServletContextInitializerBeans这边把Servlet、Filter、Listener的Bean实例转换为RegistrationBean.
public ServletContextInitializerBeans(ListableBeanFactory beanFactory,
			Class<? extends ServletContextInitializer>... initializerTypes) {
		this.initializers = new LinkedMultiValueMap<>();
		this.initializerTypes = (initializerTypes.length != 0) ? Arrays.asList(initializerTypes)
				: Collections.singletonList(ServletContextInitializer.class);
		addServletContextInitializerBeans(beanFactory);
		addAdaptableBeans(beanFactory);
		this.sortedList = this.initializers.values()
			.stream()
			.flatMap((value) -> value.stream().sorted(AnnotationAwareOrderComparator.INSTANCE))
			.toList();
		logMappings(this.initializers);
	}
转换为RegistrationBean。
	protected void addAdaptableBeans(ListableBeanFactory beanFactory) {
		MultipartConfigElement multipartConfig = getMultipartConfig(beanFactory);
		addAsRegistrationBean(beanFactory, Servlet.class, new ServletRegistrationBeanAdapter(multipartConfig));
		addAsRegistrationBean(beanFactory, Filter.class, new FilterRegistrationBeanAdapter());
		for (Class<?> listenerType : ServletListenerRegistrationBean.getSupportedTypes()) {
			addAsRegistrationBean(beanFactory, EventListener.class, (Class<EventListener>) listenerType,
					new ServletListenerRegistrationBeanAdapter());
		}
	}
然后就是执行ServletContextInitializer#onStartup方法。
ServletContextInitializer源码如下:
@FunctionalInterface
public interface ServletContextInitializer {

	/**
	 * Configure the given {@link ServletContext} with any servlets, filters, listeners
	 * context-params and attributes necessary for initialization.
	 * @param servletContext the {@code ServletContext} to initialize
	 * @throws ServletException if any call against the given {@code ServletContext}
	 * throws a {@code ServletException}
	 */
	void onStartup(ServletContext servletContext) throws ServletException;

}
继续进入RegistrationBean#onStartup方法。
	@Override
	public final void onStartup(ServletContext servletContext) throws ServletException {
		String description = getDescription();
		if (!isEnabled()) {
			logger.info(StringUtils.capitalize(description) + " was not registered (disabled)");
			return;
		}
		register(description, servletContext);
	}
再解读一下register方法。
@Override
protected final void register(String description, ServletContext servletContext) {
        D registration = addRegistration(description, servletContext);
        if (registration == null) {
        if (this.ignoreRegistrationFailure) {
        logger.info(StringUtils.capitalize(description) + " was not registered (possibly already registered?)");
        return;
        }
        throw new IllegalStateException(
        "Failed to register '%s' on the servlet context. Possibly already registered?"
        .formatted(description));
        }
        configure(registration);
        }
这里分为两步,注册到ServletContext和进行配置。
注册到ServletContext就是简单的servletContext.addXXX方法。
	@Override
	protected Dynamic addRegistration(String description, ServletContext servletContext) {
		Filter filter = getFilter();
		return servletContext.addFilter(getOrDeduceName(filter), filter);
	}
配置组件的方法则是配置Servlet和Filter的相关属性。例如配置Filter的方法,如下:
	@Override
	protected void configure(FilterRegistration.Dynamic registration) {
		super.configure(registration);
		EnumSet<DispatcherType> dispatcherTypes = this.dispatcherTypes;
		if (dispatcherTypes == null) {
			T filter = getFilter();
			if (ClassUtils.isPresent("org.springframework.web.filter.OncePerRequestFilter",
					filter.getClass().getClassLoader()) && filter instanceof OncePerRequestFilter) {
				dispatcherTypes = EnumSet.allOf(DispatcherType.class);
			}
			else {
				dispatcherTypes = EnumSet.of(DispatcherType.REQUEST);
			}
		}
		Set<String> servletNames = new LinkedHashSet<>();
		for (ServletRegistrationBean<?> servletRegistrationBean : this.servletRegistrationBeans) {
			servletNames.add(servletRegistrationBean.getServletName());
		}
		servletNames.addAll(this.servletNames);
		if (servletNames.isEmpty() && this.urlPatterns.isEmpty()) {
			registration.addMappingForUrlPatterns(dispatcherTypes, this.matchAfter, DEFAULT_URL_MAPPINGS);
		}
		else {
			if (!servletNames.isEmpty()) {
				registration.addMappingForServletNames(dispatcherTypes, this.matchAfter,
						StringUtils.toStringArray(servletNames));
			}
			if (!this.urlPatterns.isEmpty()) {
				registration.addMappingForUrlPatterns(dispatcherTypes, this.matchAfter,
						StringUtils.toStringArray(this.urlPatterns));
			}
		}
	}
这样Filter、Dispatcher就创建成功并注册到ServletContext里。
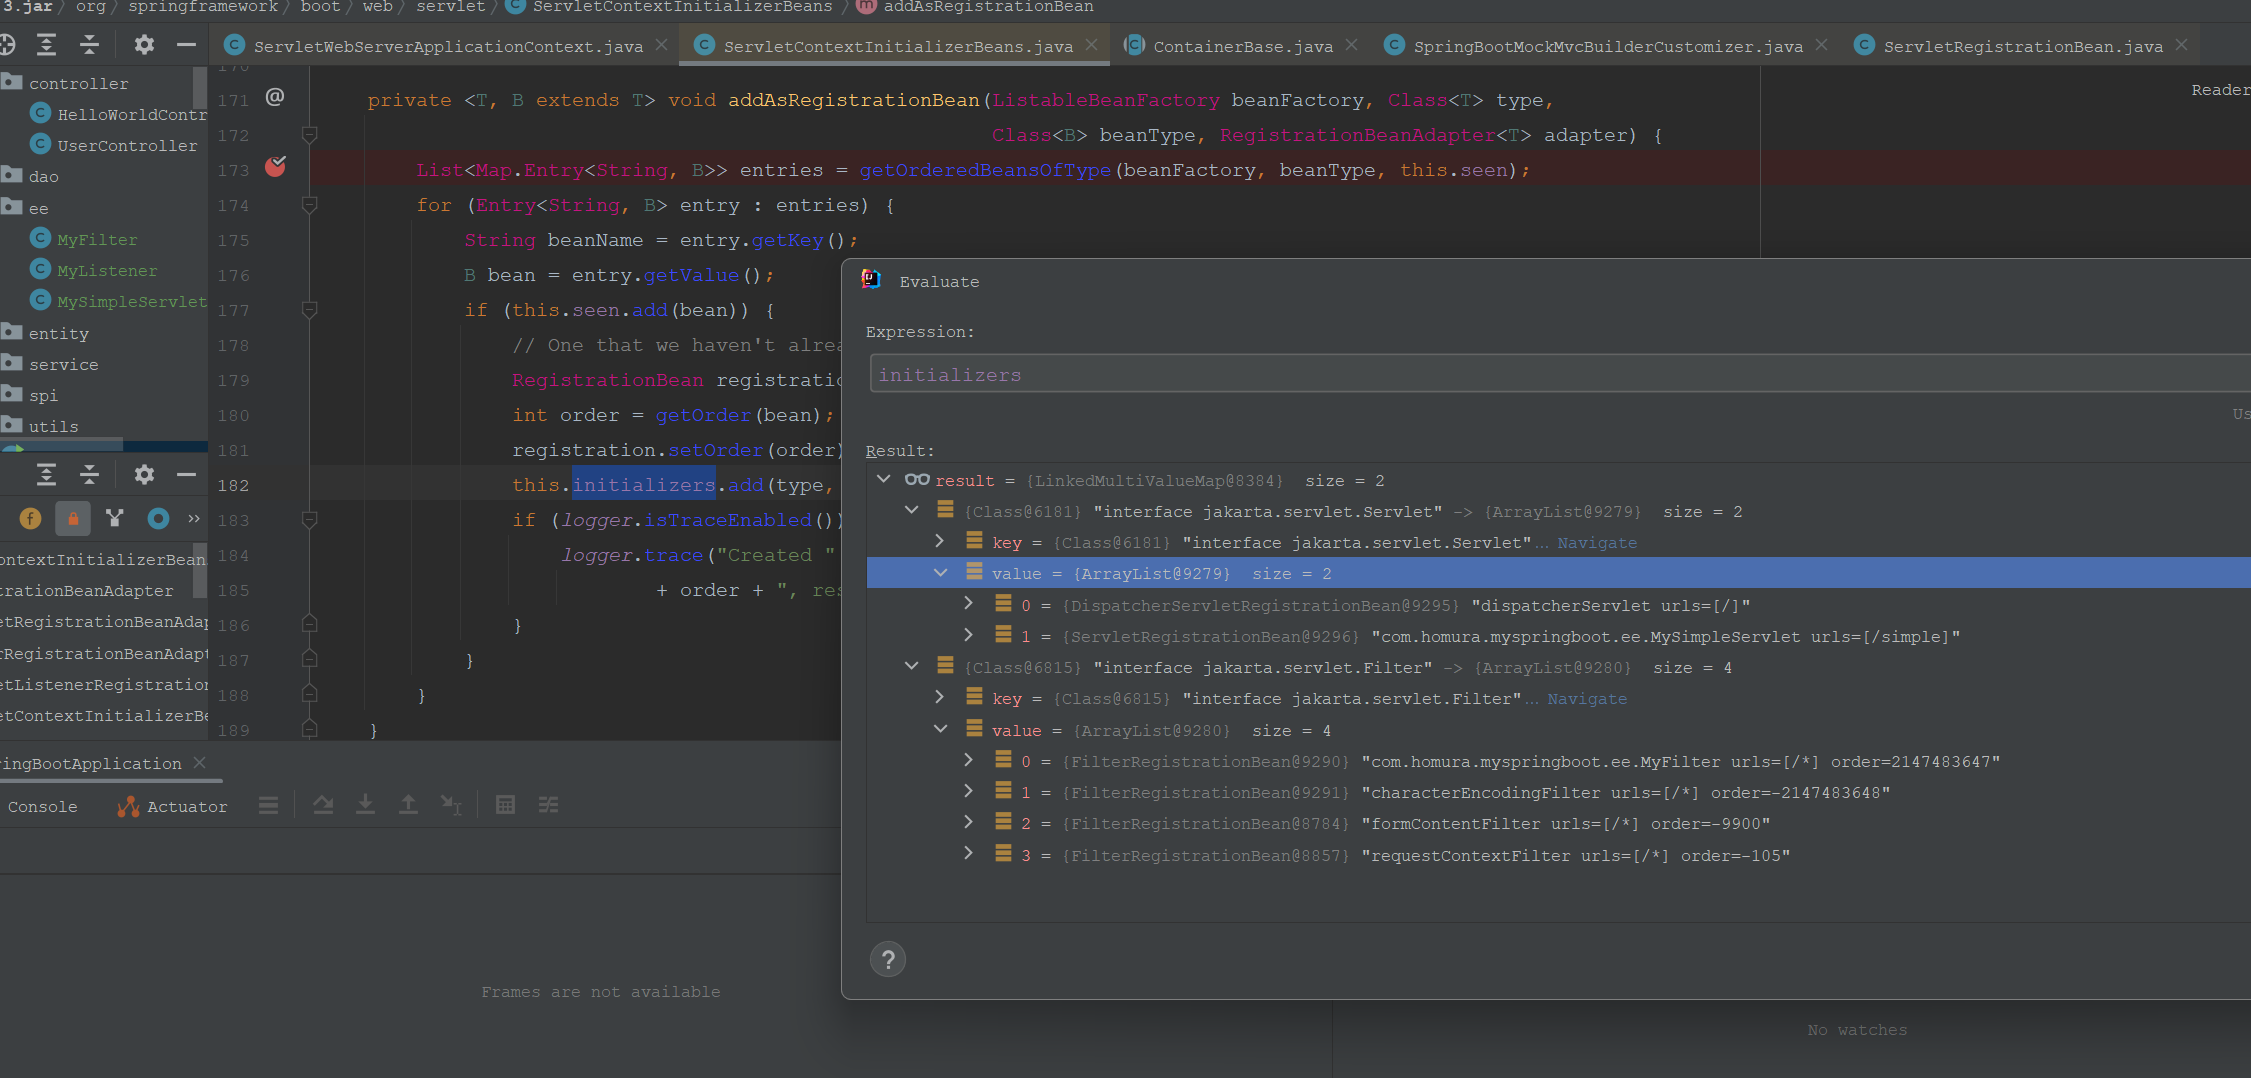
在示例工程执行过程中,这里并没有找到MyListener这个监听器的注册流程。最后在StandardContext#listenerStart这个方法找到注册MyListener的源码。
 // Instantiate the required listeners
                            //com.homura.myspringboot.ee.MyListener
        String listeners[] = findApplicationListeners();
        Object results[] = new Object[listeners.length];
        boolean ok = true;
        for (int i = 0; i < results.length; i++) {
            if (getLogger().isDebugEnabled()) {
                getLogger().debug(" Configuring event listener class '" + listeners[i] + "'");
            }
            try {
                String listener = listeners[i];
                results[i] = getInstanceManager().newInstance(listener);
            } catch (Throwable t) {
                t = ExceptionUtils.unwrapInvocationTargetException(t);
                ExceptionUtils.handleThrowable(t);
                getLogger().error(sm.getString("standardContext.applicationListener", listeners[i]), t);
                ok = false;
            }
        }
        if (!ok) {
            getLogger().error(sm.getString("standardContext.applicationSkipped"));
            return false;
        }

        // Sort listeners in two arrays
        List<Object> eventListeners = new ArrayList<>();
        List<Object> lifecycleListeners = new ArrayList<>();
        for (Object result : results) {
            if ((result instanceof ServletContextAttributeListener) ||
                    (result instanceof ServletRequestAttributeListener) || (result instanceof ServletRequestListener) ||
                    (result instanceof HttpSessionIdListener) || (result instanceof HttpSessionAttributeListener)) {
                eventListeners.add(result);
            }
            if ((result instanceof ServletContextListener) || (result instanceof HttpSessionListener)) {
                lifecycleListeners.add(result);
            }
        }
而findApplicationListeners()内applicationListeners监听器列表,由在创建TomcatServer配置Tomcat的Context时候的这个TomcatServletWebServerFactory#configureContext方法内注冊到Context的。 代码如下:
	for (String webListenerClassName : getWebListenerClassNames()) {
			context.addApplicationListener(webListenerClassName);
		}
简单总结一下注册这三类组件的流程:
- ServletComponentScan注解引入的ServletComponentScanRegistrar注册了ServletComponentRegisteringPostProcessor,由ServletComponentRegisteringPostProcessor注册
WebFilter、WebListener、WebServlet注解标识的Bean。
- ServletContextInitializerBeans将其适配为XXXRegistrationBean,RegistrationBean实现了ServletContextInitializer接口。
- 创建WebServer过程中调用ServletContextInitializer的onStartup方法注册和配置Filter、Listener、Servlet等组件。
五、参考材料
1.《Spring Boot Reference Documentation》(version 3.1.5)
2.SpringBoot源码(版本3.1.3)