
本文是SpringBoot源码阅读计划的第二篇文章,本文主要介绍一下SpringBoot的启动流程。
 public static void main(String[] args) {
        SpringApplication.run(MySpringBootApplication.class, args);
    }
主类启动代码就这样一行,本文将简单解读一下SpringApplication的创建流程和run方法。 本文源码地址为:https://github.com/zouhuanli/MySpringBoot.git。
一、SpringApplication的创建流程
跟踪run方法来到:
public static ConfigurableApplicationContext run(Class<?>[] primarySources, String[] args) {
		return new SpringApplication(primarySources).run(args);
	}
和
public SpringApplication(Class<?>... primarySources) {
		this(null, primarySources);
	}
进入SpringApplication的构造器方法。
public SpringApplication(ResourceLoader resourceLoader, Class<?>... primarySources) {
                            //资源加载器
		this.resourceLoader = resourceLoader;
		Assert.notNull(primarySources, "PrimarySources must not be null");
                            //加载源,这里就是MySpringBootApplication.class
		this.primarySources = new LinkedHashSet<>(Arrays.asList(primarySources));
                            //判断APP应用的类型,类型有;NONE-无需WEB的jar应用,SERVLET、REACTIVE-两个类型的Web应用
		this.webApplicationType = WebApplicationType.deduceFromClasspath();
                            //创建初始化器
		this.bootstrapRegistryInitializers = new ArrayList<>(
				getSpringFactoriesInstances(BootstrapRegistryInitializer.class));
		setInitializers((Collection) getSpringFactoriesInstances(ApplicationContextInitializer.class));
                            //设置监听器
		setListeners((Collection) getSpringFactoriesInstances(ApplicationListener.class));
                            //应用主类
		this.mainApplicationClass = deduceMainApplicationClass();
	}
我们主要分析这几个方法。
1.确定webApplicationType
确定应用类型的方法deduceFromClasspath很简单,如下:
static WebApplicationType deduceFromClasspath() {
                            //REACTIVE栈
        if (ClassUtils.isPresent(WEBFLUX_INDICATOR_CLASS, null) && !ClassUtils.isPresent(WEBMVC_INDICATOR_CLASS, null)
        && !ClassUtils.isPresent(JERSEY_INDICATOR_CLASS, null)) {
        return WebApplicationType.REACTIVE;
        }
                            //尝试加载 SERVLET_INDICATOR_CLASSES = { "jakarta.servlet.Servlet","org.springframework.web.context.ConfigurableWebApplicationContext" };
        for (String className : SERVLET_INDICATOR_CLASSES) {
        if (!ClassUtils.isPresent(className, null)) {
        return WebApplicationType.NONE;
              }
            }
                            //加载Servlet和ConfigurableWebApplicationContext都成功,返回SERVLET
        return WebApplicationType.SERVLET;
        }
可以看到,不引入reactive栈时候,加载DispatcherServlet和ServletContainer都成功时候应用类型是WebApplicationType.SERVLET,否则是默认的jar应用。 可以通过SpringApplication#setWebApplicationType手动设置类型,引用了web模块也可以设置为NONE类型。
2.设置初始化器
初始化器是及其重要的,在后续的各流程中会使用到这些初始化器。初始化器简单说是SpringBoot内部创建的一系列组件,在各个流程使用。
我们回顾一下《DispatcherServlet的初始化流程》这篇文章,其中的initStrategies方法:
protected void initStrategies(ApplicationContext context) {
		initMultipartResolver(context);
		initLocaleResolver(context);
		initThemeResolver(context);
		initHandlerMappings(context);
		initHandlerAdapters(context);
		initHandlerExceptionResolvers(context);
		initRequestToViewNameTranslator(context);
		initViewResolvers(context);
		initFlashMapManager(context);
	}
上面这里从DispatcherServlet.properties文件创建默认的九大组件。
而初始化器或者说工厂组件是通过spring.factories文件来配置的,如下:
# Logging Systems
org.springframework.boot.logging.LoggingSystemFactory=\
org.springframework.boot.logging.logback.LogbackLoggingSystem.Factory,\
org.springframework.boot.logging.log4j2.Log4J2LoggingSystem.Factory,\
org.springframework.boot.logging.java.JavaLoggingSystem.Factory

# PropertySource Loaders
org.springframework.boot.env.PropertySourceLoader=\
org.springframework.boot.env.PropertiesPropertySourceLoader,\
org.springframework.boot.env.YamlPropertySourceLoader

# ConfigData Location Resolvers
org.springframework.boot.context.config.ConfigDataLocationResolver=\
org.springframework.boot.context.config.ConfigTreeConfigDataLocationResolver,\
org.springframework.boot.context.config.StandardConfigDataLocationResolver

# ConfigData Loaders
org.springframework.boot.context.config.ConfigDataLoader=\
org.springframework.boot.context.config.ConfigTreeConfigDataLoader,\
org.springframework.boot.context.config.StandardConfigDataLoader

# Application Context Factories
org.springframework.boot.ApplicationContextFactory=\
org.springframework.boot.web.reactive.context.ReactiveWebServerApplicationContextFactory,\
org.springframework.boot.web.servlet.context.ServletWebServerApplicationContextFactory

# Run Listeners
org.springframework.boot.SpringApplicationRunListener=\
org.springframework.boot.context.event.EventPublishingRunListener

# Error Reporters
org.springframework.boot.SpringBootExceptionReporter=\
org.springframework.boot.diagnostics.FailureAnalyzers

# Application Context Initializers
org.springframework.context.ApplicationContextInitializer=\
org.springframework.boot.context.ConfigurationWarningsApplicationContextInitializer,\
org.springframework.boot.context.ContextIdApplicationContextInitializer,\
org.springframework.boot.context.config.DelegatingApplicationContextInitializer,\
org.springframework.boot.rsocket.context.RSocketPortInfoApplicationContextInitializer,\
org.springframework.boot.web.context.ServerPortInfoApplicationContextInitializer

# Application Listeners
org.springframework.context.ApplicationListener=\
org.springframework.boot.ClearCachesApplicationListener,\
org.springframework.boot.builder.ParentContextCloserApplicationListener,\
org.springframework.boot.context.FileEncodingApplicationListener,\
org.springframework.boot.context.config.AnsiOutputApplicationListener,\
org.springframework.boot.context.config.DelegatingApplicationListener,\
org.springframework.boot.context.logging.LoggingApplicationListener,\
org.springframework.boot.env.EnvironmentPostProcessorApplicationListener

# Environment Post Processors
org.springframework.boot.env.EnvironmentPostProcessor=\
org.springframework.boot.cloud.CloudFoundryVcapEnvironmentPostProcessor,\
org.springframework.boot.context.config.ConfigDataEnvironmentPostProcessor,\
org.springframework.boot.env.RandomValuePropertySourceEnvironmentPostProcessor,\
org.springframework.boot.env.SpringApplicationJsonEnvironmentPostProcessor,\
org.springframework.boot.env.SystemEnvironmentPropertySourceEnvironmentPostProcessor,\
org.springframework.boot.reactor.DebugAgentEnvironmentPostProcessor

# Failure Analyzers
org.springframework.boot.diagnostics.FailureAnalyzer=\
org.springframework.boot.context.config.ConfigDataNotFoundFailureAnalyzer,\
org.springframework.boot.context.properties.IncompatibleConfigurationFailureAnalyzer,\
org.springframework.boot.context.properties.NotConstructorBoundInjectionFailureAnalyzer,\
org.springframework.boot.diagnostics.analyzer.BeanCurrentlyInCreationFailureAnalyzer,\
org.springframework.boot.diagnostics.analyzer.BeanDefinitionOverrideFailureAnalyzer,\
org.springframework.boot.diagnostics.analyzer.BeanNotOfRequiredTypeFailureAnalyzer,\
org.springframework.boot.diagnostics.analyzer.BindFailureAnalyzer,\
org.springframework.boot.diagnostics.analyzer.BindValidationFailureAnalyzer,\
org.springframework.boot.diagnostics.analyzer.UnboundConfigurationPropertyFailureAnalyzer,\
org.springframework.boot.diagnostics.analyzer.MutuallyExclusiveConfigurationPropertiesFailureAnalyzer,\
org.springframework.boot.diagnostics.analyzer.NoSuchMethodFailureAnalyzer,\
org.springframework.boot.diagnostics.analyzer.NoUniqueBeanDefinitionFailureAnalyzer,\
org.springframework.boot.diagnostics.analyzer.PortInUseFailureAnalyzer,\
org.springframework.boot.diagnostics.analyzer.ValidationExceptionFailureAnalyzer,\
org.springframework.boot.diagnostics.analyzer.InvalidConfigurationPropertyNameFailureAnalyzer,\
org.springframework.boot.diagnostics.analyzer.InvalidConfigurationPropertyValueFailureAnalyzer,\
org.springframework.boot.diagnostics.analyzer.PatternParseFailureAnalyzer,\
org.springframework.boot.liquibase.LiquibaseChangelogMissingFailureAnalyzer,\
org.springframework.boot.web.context.MissingWebServerFactoryBeanFailureAnalyzer,\
org.springframework.boot.web.embedded.tomcat.ConnectorStartFailureAnalyzer

# Failure Analysis Reporters
org.springframework.boot.diagnostics.FailureAnalysisReporter=\
org.springframework.boot.diagnostics.LoggingFailureAnalysisReporter

# Database Initializer Detectors
org.springframework.boot.sql.init.dependency.DatabaseInitializerDetector=\
org.springframework.boot.flyway.FlywayDatabaseInitializerDetector,\
org.springframework.boot.jdbc.init.DataSourceScriptDatabaseInitializerDetector,\
org.springframework.boot.liquibase.LiquibaseDatabaseInitializerDetector,\
org.springframework.boot.orm.jpa.JpaDatabaseInitializerDetector,\
org.springframework.boot.r2dbc.init.R2dbcScriptDatabaseInitializerDetector

# Depends On Database Initialization Detectors
org.springframework.boot.sql.init.dependency.DependsOnDatabaseInitializationDetector=\
org.springframework.boot.sql.init.dependency.AnnotationDependsOnDatabaseInitializationDetector,\
org.springframework.boot.jdbc.SpringJdbcDependsOnDatabaseInitializationDetector,\
org.springframework.boot.jooq.JooqDependsOnDatabaseInitializationDetector,\
org.springframework.boot.orm.jpa.JpaDependsOnDatabaseInitializationDetector
这里创建初始化器/工厂组件与其相似,从“META-INF/spring.factories”读取初始化器/工厂组件的默认实现策略,在获取初始器时候进行实例化。
我们跟踪getSpringFactoriesInstances方法来到:
                        //FACTORIES_RESOURCE_LOCATION="META-INF/spring.factories"
public static SpringFactoriesLoader forDefaultResourceLocation(@Nullable ClassLoader classLoader) {
		return forResourceLocation(FACTORIES_RESOURCE_LOCATION, classLoader);
	}
这里加载了spring.factories的所有配置。继续进入这两个方法:
public static SpringFactoriesLoader forResourceLocation(String resourceLocation, @Nullable ClassLoader classLoader) {
		Assert.hasText(resourceLocation, "'resourceLocation' must not be empty");
		ClassLoader resourceClassLoader = (classLoader != null ? classLoader :
				SpringFactoriesLoader.class.getClassLoader());
		Map<String, SpringFactoriesLoader> loaders = cache.computeIfAbsent(
				resourceClassLoader, key -> new ConcurrentReferenceHashMap<>());
		return loaders.computeIfAbsent(resourceLocation, key ->
				new SpringFactoriesLoader(classLoader, loadFactoriesResource(resourceClassLoader, resourceLocation)));
	}

	protected static Map<String, List<String>> loadFactoriesResource(ClassLoader classLoader, String resourceLocation) {
		Map<String, List<String>> result = new LinkedHashMap<>();
		try {
			Enumeration<URL> urls = classLoader.getResources(resourceLocation);
			while (urls.hasMoreElements()) {
				UrlResource resource = new UrlResource(urls.nextElement());
				Properties properties = PropertiesLoaderUtils.loadProperties(resource);
				properties.forEach((name, value) -> {
					String[] factoryImplementationNames = StringUtils.commaDelimitedListToStringArray((String) value);
					List<String> implementations = result.computeIfAbsent(((String) name).trim(),
							key -> new ArrayList<>(factoryImplementationNames.length));
					Arrays.stream(factoryImplementationNames).map(String::trim).forEach(implementations::add);
				});
			}
			result.replaceAll(SpringFactoriesLoader::toDistinctUnmodifiableList);
		}
		catch (IOException ex) {
			throw new IllegalArgumentException("Unable to load factories from location [" + resourceLocation + "]", ex);
		}
		return Collections.unmodifiableMap(result);
	}
其解析的配置的类型列表如下:
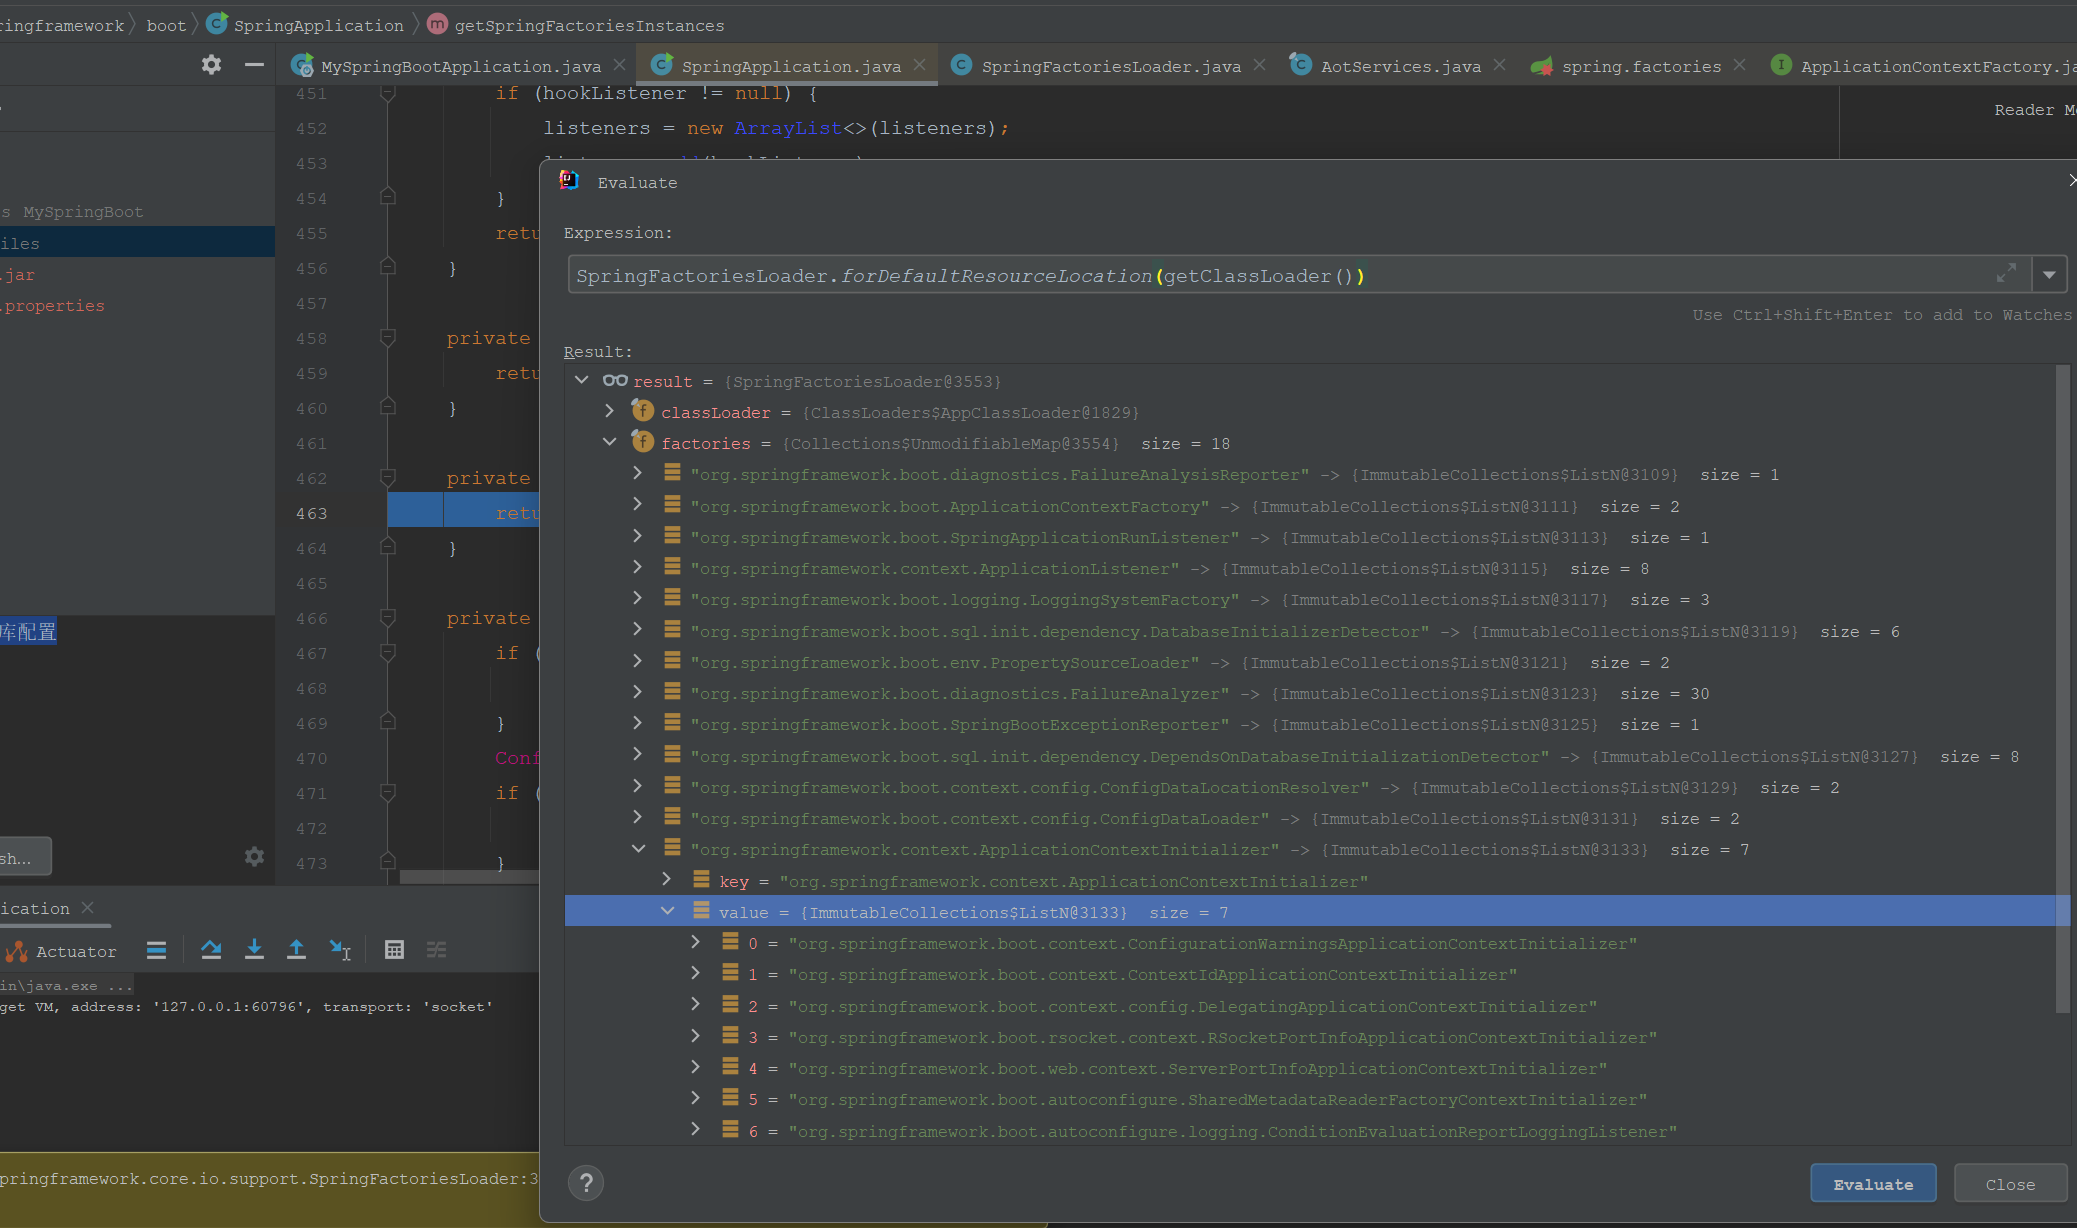
和spring.factories配置信息一致,这里只是加载了spring.factories配置信息,并没有真正创建某一个工厂类的实例。
创建工厂类的实例是通过load方法去懒加载来创建的,实际用到了哪个类型才创建,和Java SPI一样。
load方法如下:
                    //创建一个类型的,配置中的所有对应的实现类的实例
public <T> List<T> load(Class<T> factoryType, @Nullable ArgumentResolver argumentResolver,
			@Nullable FailureHandler failureHandler) {

		Assert.notNull(factoryType, "'factoryType' must not be null");
		List<String> implementationNames = loadFactoryNames(factoryType);
		logger.trace(LogMessage.format("Loaded [%s] names: %s", factoryType.getName(), implementationNames));
		List<T> result = new ArrayList<>(implementationNames.size());
		FailureHandler failureHandlerToUse = (failureHandler != null) ? failureHandler : THROWING_FAILURE_HANDLER;
		for (String implementationName : implementationNames) {
			T factory = instantiateFactory(implementationName, factoryType, argumentResolver, failureHandlerToUse);
			if (factory != null) {
				result.add(factory);
			}
		}
		AnnotationAwareOrderComparator.sort(result);
		return result;
	}
继续阅读是使用反射创建对应对象的,不再深入解读。
而Java SPI是”Service Provider Interface”,是Java自带的服务拓展加载和发现机制,允许一个接口的实现类型从配置文件加载、解析,从而创建实现对象。
例如,定义一个接口:
/**
 * 一个正常的接口
 */
public interface TestSpiInterface {
    /**
     * 测试方法
     */
    void test();
}
以及三个实现类:
/**
 * 实现类,可以是多个,可以不是本工程或者包,允许从第三方jar包中获取
 */
public class TestSpiInterfaceA implements TestSpiInterface {
    @Override
    public void test() {
        System.out.println("TestSpiInterfaceA");
    }
}


/**
 * 实现类,可以是多个,可以不是本工程或者包,允许从第三方jar包中获取
 */
public class TestSpiInterfaceB implements TestSpiInterface {
    @Override
    public void test() {
        System.out.println("TestSpiInterfaceB");
    }
}
/**
 * 实现类,可以是多个,可以不是本工程或者包,允许从第三方jar包中获取
 */
public class TestSpiInterfaceC implements TestSpiInterface {
    @Override
    public void test() {
        System.out.println("TestSpiInterfaceC");
    }
}
创建META-INF.services.com.homura.myspringboot.spi.TestSpiInterface文件,如下:
com.homura.myspringboot.spi.impl.TestSpiInterfaceA
com.homura.myspringboot.spi.impl.TestSpiInterfaceC
测试主类如下:
 public static void main(String[] args) {
        // 通过ServiceLoader加载实现类
        ServiceLoader<TestSpiInterface> serviceLoader = ServiceLoader.load(TestSpiInterface.class);
        for (TestSpiInterface testSpiInterface : serviceLoader) {
            testSpiInterface.test();
        }
    }
输出结果:
TestSpiInterfaceA
TestSpiInterfaceC
SPI机制允许第三方实现拓展然后加入配置文件,增加了获得拓展的动态性。
有的文章说到SpringFactoriesLoader也是SPI机制,这里不做过多比较和解读。
3.设置监听器
设置监听器和上面设置BootstrapRegistryInitializer、ApplicationContextInitializer是一样的,仅仅是加载拓展的类型不一样,也是SpringFactoriesLoader从spring.factories
加载ApplicationListener拓展的实现类型列表,要注意的是spring.factories整个配置列表只会加载一次,后续需要哪种拓展类型的实现类型直接进入load就行。
deduceMainApplicationClass是确定主类,这里mainApplicationClass=MySpringBootApplication.class。
现在SpringApplication创建完成了,接下来解读run方法,应用的启动方法。
二、SpringApplication#run方法
在解读run方法启动方法之前,我们简单回顾一下«AnnotationConfigApplicationContext初始化流程»和
«BeanFactoryPostProcessor解读»这两篇文章。
在AnnotationConfigApplicationContext初始化流程这里,我们知道ApplicationContext首先注册了应用启动的配置类AppConfig这个Bean,然后在refresh流程的中的invokeBeanDefinitionRegistryPostProcessors使用ConfigurationClassPostProcessor去解析和注册注解配置的bean,期间用到了ConfigurationClassBeanDefinitionReader、AnnotatedBeanDefinitionReader、ConfigurationClassParser、ComponentScanAnnotationParser、ComponentScanBeanDefinitionParser等类去解析对应注解以及引入的注解配置的Bean。
因此,可以这里推断SpringBoot启动的ApplicationContext也是类似AnnotationConfigApplicationContext,也应是在invokeBeanFactoryPostProcessors方法内通过ConfigurationClassPostProcessor实现注解配置的Bean的注册流程。
此外,因为WEB项目是默认创建内嵌的tomcat容器,run方法启动代码中也应该创建tomcat容器。
下面开始解读run方法。
1.创建BootstrapContext
创建启动上下文这个方法很简单,就是启动注册的bootstrapRegistryInitializers的初始化方法。
private DefaultBootstrapContext createBootstrapContext() {
		DefaultBootstrapContext bootstrapContext = new DefaultBootstrapContext();
		this.bootstrapRegistryInitializers.forEach((initializer) -> initializer.initialize(bootstrapContext));
		return bootstrapContext;
	}
2.获得监听器和启动监听器
private SpringApplicationRunListeners getRunListeners(String[] args) {
		ArgumentResolver argumentResolver = ArgumentResolver.of(SpringApplication.class, this);
		argumentResolver = argumentResolver.and(String[].class, args);
		List<SpringApplicationRunListener> listeners = getSpringFactoriesInstances(SpringApplicationRunListener.class,
				argumentResolver);
		SpringApplicationHook hook = applicationHook.get();
		SpringApplicationRunListener hookListener = (hook != null) ? hook.getRunListener(this) : null;
		if (hookListener != null) {
			listeners = new ArrayList<>(listeners);
			listeners.add(hookListener);
		}
		return new SpringApplicationRunListeners(logger, listeners, this.applicationStartup);
	}
这里的监听器依赖是从SpringFactoriesLoader读取到spring.factories去实例化,这里默认注册的监听器是EventPublishingRunListener。
然后是调用监听器的starting方法:
void starting(ConfigurableBootstrapContext bootstrapContext, Class<?> mainApplicationClass) {
		doWithListeners("spring.boot.application.starting", (listener) -> listener.starting(bootstrapContext),
				(step) -> {
					if (mainApplicationClass != null) {
						step.tag("mainApplicationClass", mainApplicationClass.getName());
					}
				});
	}
3.准备环境
private ConfigurableEnvironment prepareEnvironment(SpringApplicationRunListeners listeners,
			DefaultBootstrapContext bootstrapContext, ApplicationArguments applicationArguments) {
		// Create and configure the environment
                            //创建环境
		ConfigurableEnvironment environment = getOrCreateEnvironment();
                            //配置环境
		configureEnvironment(environment, applicationArguments.getSourceArgs());
		ConfigurationPropertySources.attach(environment);
                            //发布监听事件:环境已准备好
		listeners.environmentPrepared(bootstrapContext, environment);
		DefaultPropertiesPropertySource.moveToEnd(environment);
		Assert.state(!environment.containsProperty("spring.main.environment-prefix"),
				"Environment prefix cannot be set via properties.");
		bindToSpringApplication(environment);
		if (!this.isCustomEnvironment) {
			EnvironmentConverter environmentConverter = new EnvironmentConverter(getClassLoader());
			environment = environmentConverter.convertEnvironmentIfNecessary(environment, deduceEnvironmentClass());
		}
		ConfigurationPropertySources.attach(environment);
		return environment;
	}
跟踪environmentPrepared方法,来到下面代码:
	@Override
	public void environmentPrepared(ConfigurableBootstrapContext bootstrapContext,
			ConfigurableEnvironment environment) {
		multicastInitialEvent(
				new ApplicationEnvironmentPreparedEvent(bootstrapContext, this.application, this.args, environment));
	}
这里发布了ApplicationEnvironmentPreparedEvent这个事件,我们继续查找一下使用了这个事件的监听器,来到EnvironmentPostProcessorApplicationListener,来到下面方法:
@Override
	public void onApplicationEvent(ApplicationEvent event) {
		if (event instanceof ApplicationEnvironmentPreparedEvent environmentPreparedEvent) {
			onApplicationEnvironmentPreparedEvent(environmentPreparedEvent);
		}
		if (event instanceof ApplicationPreparedEvent) {
			onApplicationPreparedEvent();
		}
		if (event instanceof ApplicationFailedEvent) {
			onApplicationFailedEvent();
		}
	}
继续进入onApplicationEnvironmentPreparedEvent方法:
private void onApplicationEnvironmentPreparedEvent(ApplicationEnvironmentPreparedEvent event) {
		ConfigurableEnvironment environment = event.getEnvironment();
		SpringApplication application = event.getSpringApplication();
		for (EnvironmentPostProcessor postProcessor : getEnvironmentPostProcessors(application.getResourceLoader(),
				event.getBootstrapContext())) {
			postProcessor.postProcessEnvironment(environment, application);
		}
	}
在来到ConfigDataEnvironmentPostProcessor#postProcessEnvironment方法
@Override
	public void postProcessEnvironment(ConfigurableEnvironment environment, SpringApplication application) {
		postProcessEnvironment(environment, application.getResourceLoader(), application.getAdditionalProfiles());
	}
继续进入发现创建了ConfigDataEnvironment这个对象,这个类型是项目配置的类,其在下面代码设置了默认扫描配置文件的路径。
static {
		List<ConfigDataLocation> locations = new ArrayList<>();
		locations.add(ConfigDataLocation.of("optional:classpath:/;optional:classpath:/config/"));
		locations.add(ConfigDataLocation.of("optional:file:./;optional:file:./config/;optional:file:./config/*/"));
		DEFAULT_SEARCH_LOCATIONS = locations.toArray(new ConfigDataLocation[0]);
	}
4.createApplicationContext创建容器和上下文
createApplicationContext方法只是按照应用类型创建ApplicationContext上下文对象。 在解读ApplicationContext整体结构的文章中有提及到主要有两类的上下文,一类是refreshable的可以刷新的,一类是generic不刷新的。而示例工程是一个Web项目因此创建的ApplicationContext应该是generic的子类,应该是基于注解的AnnotationWebXXXContext这样的。 跟踪测试流程发现这里创建的是AnnotationConfigServletWebServerApplicationContext(名字好长啊),其类关系图如下:
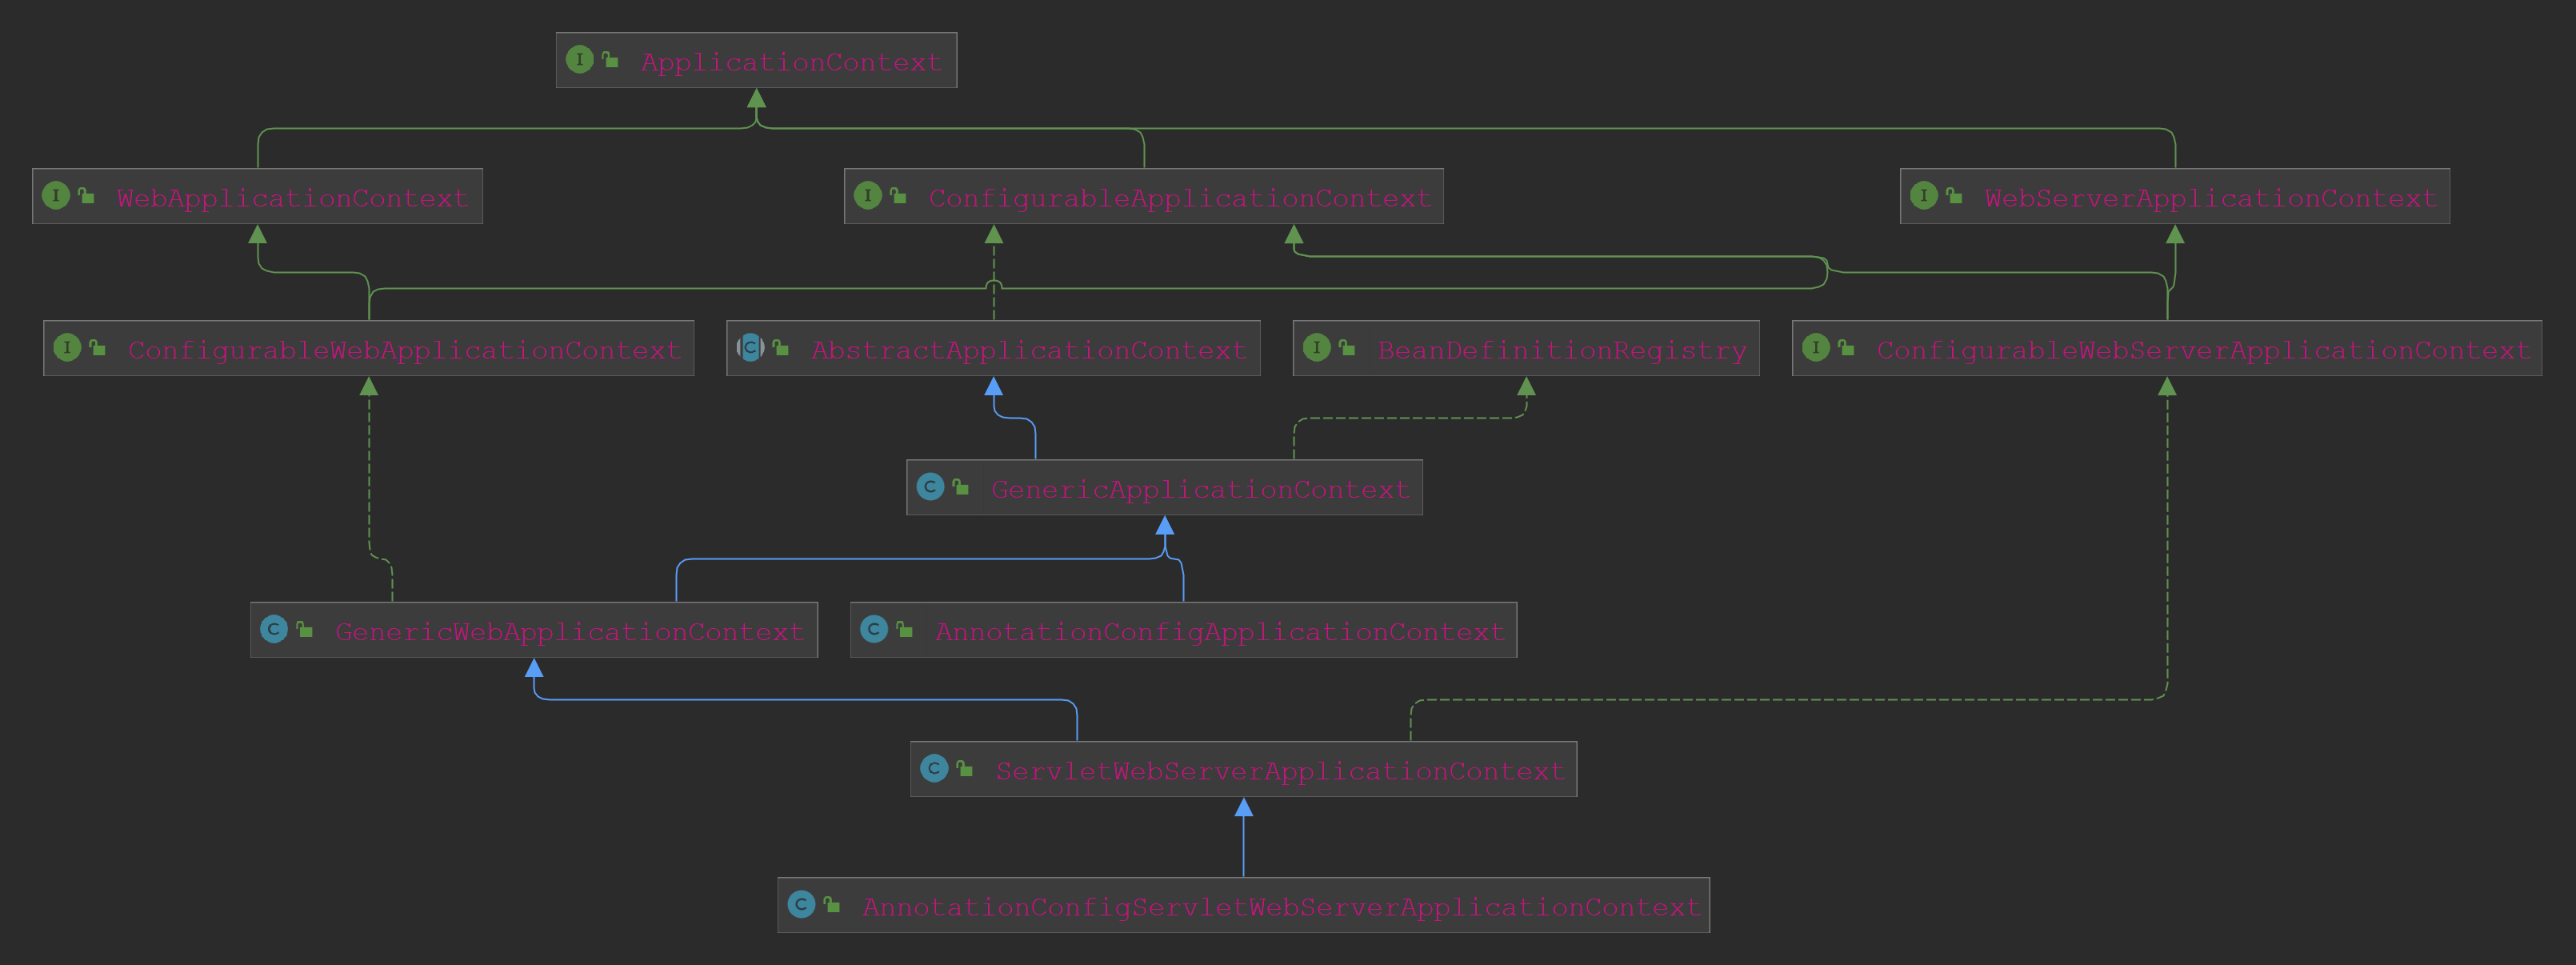
可以看到这里boot对标准Spring的ApplicationContext做了一些拓展和定制化。而手动设置应用类型为NONE,普通的标准Java应用自然是上下文对象是AnnotationConfigApplicationContext。
5.prepareContext准备上下文
准备上下文是在context的刷新方法之前做一下前置处理。
private void prepareContext(DefaultBootstrapContext bootstrapContext, ConfigurableApplicationContext context,
ConfigurableEnvironment environment, SpringApplicationRunListeners listeners,
ApplicationArguments applicationArguments, Banner printedBanner) {
//设置环境
context.setEnvironment(environment);
//一些后置处理
postProcessApplicationContext(context);
//aot相关
addAotGeneratedInitializerIfNecessary(this.initializers);
//初始化器的初始化方法
applyInitializers(context);
listeners.contextPrepared(context);
bootstrapContext.close(context);
if (this.logStartupInfo) {
logStartupInfo(context.getParent() == null);
logStartupProfileInfo(context);
}
// Add boot specific singleton beans
//注册相关Bean
ConfigurableListableBeanFactory beanFactory = context.getBeanFactory();
beanFactory.registerSingleton("springApplicationArguments", applicationArguments);
if (printedBanner != null) {
beanFactory.registerSingleton("springBootBanner", printedBanner);
}
if (beanFactory instanceof AbstractAutowireCapableBeanFactory autowireCapableBeanFactory) {
autowireCapableBeanFactory.setAllowCircularReferences(this.allowCircularReferences);
if (beanFactory instanceof DefaultListableBeanFactory listableBeanFactory) {
listableBeanFactory.setAllowBeanDefinitionOverriding(this.allowBeanDefinitionOverriding);
}
}
if (this.lazyInitialization) {
context.addBeanFactoryPostProcessor(new LazyInitializationBeanFactoryPostProcessor());
}
context.addBeanFactoryPostProcessor(new PropertySourceOrderingBeanFactoryPostProcessor(context));
if (!AotDetector.useGeneratedArtifacts()) {
// Load the sources
Set<Object> sources = getAllSources();
Assert.notEmpty(sources, "Sources must not be empty");
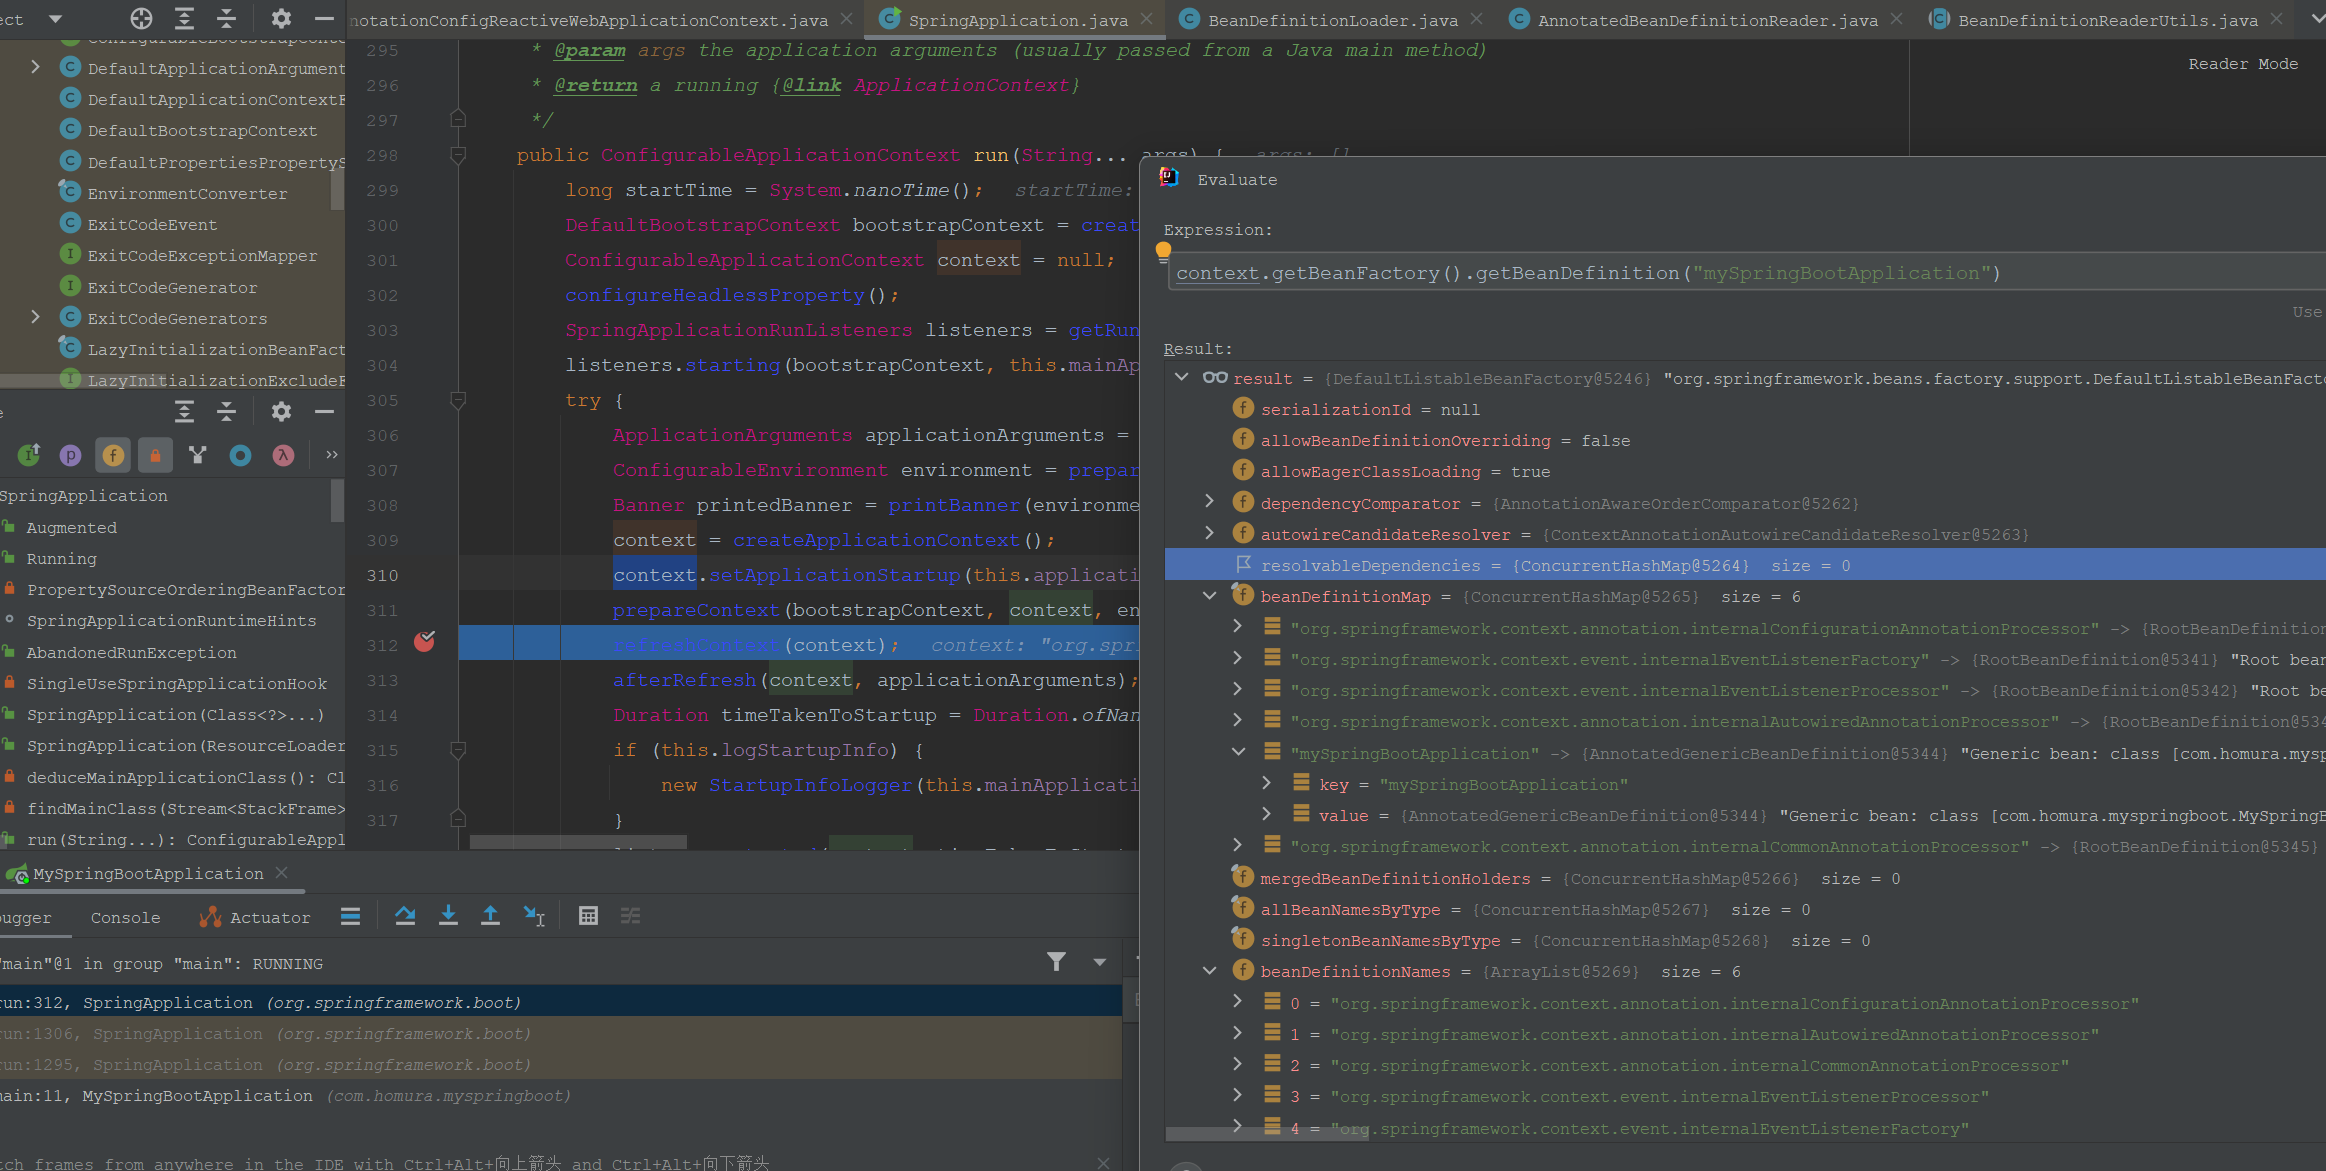
//注意看这行代码,注册启动类,也就是MySpringBootApplication这个类,和AnnotationConfigApplicationContext注册启动主配置类一样。
load(context, sources.toArray(new Object[0]));
}
listeners.contextLoaded(context);
}
我们继续跟踪BeanDefinitionLoader#load方法,如下:
private void load(Object source) {
		Assert.notNull(source, "Source must not be null");
		if (source instanceof Class<?> clazz) {
			load(clazz);
			return;
		}
		if (source instanceof Resource resource) {
			load(resource);
			return;
		}
		if (source instanceof Package pack) {
			load(pack);
			return;
		}
		if (source instanceof CharSequence sequence) {
			load(sequence);
			return;
		}
		throw new IllegalArgumentException("Invalid source type " + source.getClass());
	}
BeanDefinitionLoader是融合读取XML的bean配置,注解的Bean配置(Component、@Configuration、@Bean等),以及groovy配置这三种的综合型的读取器。
然后进入AnnotatedBeanDefinitionReader的注册方法,注册主配置类MySpringBootApplication到容器BeanFactory中,存入beanDefinitionMap。
这里只注册了主配置类和一些框架本身的基础设施类,尚未没有开始注册应用的全部的bean ,如下。
应用内其他的Bean是在refresh方法内部的invokeBeanFactoryPostProcessors方法通过ConfigurationClassPostProcessor去注册的。
6.refresh刷新容器
refresh方法就是AbstractApplicationContext的刷新方法,是销毁旧容器、创建和配置新容器,刷新整个应用下文的方法。这里额外注册了关闭钩子。
	private void refreshContext(ConfigurableApplicationContext context) {
		if (this.registerShutdownHook) {
			shutdownHook.registerApplicationContext(context);
		}
		refresh(context);
	}
refresh方法这里不再过多解读,其基本方法如下:
@Override
	public void refresh() throws BeansException, IllegalStateException {
		synchronized (this.startupShutdownMonitor) {
			StartupStep contextRefresh = this.applicationStartup.start("spring.context.refresh");

			// Prepare this context for refreshing.
			prepareRefresh();

			// Tell the subclass to refresh the internal bean factory.
			ConfigurableListableBeanFactory beanFactory = obtainFreshBeanFactory();

			// Prepare the bean factory for use in this context.
			prepareBeanFactory(beanFactory);

			try {
				// Allows post-processing of the bean factory in context subclasses.
				postProcessBeanFactory(beanFactory);

				StartupStep beanPostProcess = this.applicationStartup.start("spring.context.beans.post-process");
				// Invoke factory processors registered as beans in the context.
				invokeBeanFactoryPostProcessors(beanFactory);

				// Register bean processors that intercept bean creation.
				registerBeanPostProcessors(beanFactory);
				beanPostProcess.end();

				// Initialize message source for this context.
				initMessageSource();

				// Initialize event multicaster for this context.
				initApplicationEventMulticaster();

				// Initialize other special beans in specific context subclasses.
				onRefresh();

				// Check for listener beans and register them.
				registerListeners();

				// Instantiate all remaining (non-lazy-init) singletons.
				finishBeanFactoryInitialization(beanFactory);

				// Last step: publish corresponding event.
				finishRefresh();
			}

			catch (BeansException ex) {
				if (logger.isWarnEnabled()) {
					logger.warn("Exception encountered during context initialization - " +
							"cancelling refresh attempt: " + ex);
				}

				// Destroy already created singletons to avoid dangling resources.
				destroyBeans();

				// Reset 'active' flag.
				cancelRefresh(ex);

				// Propagate exception to caller.
				throw ex;
			}

			finally {
				// Reset common introspection caches in Spring's core, since we
				// might not ever need metadata for singleton beans anymore...
				resetCommonCaches();
				contextRefresh.end();
			}
		}
	}
refresh方法是创建上下文和容器及其核心的方法,笔者的多个文章有涉及这个方法。读者可以参考阅读一下这篇文章“Spring IoC容器初始化流程”。 下面笔者解读一下和boot有关联的两个方法。
6.1 特别点1:onRefresh方法
默认的onRefresh方法是一个空方法。
/**
	 * Template method which can be overridden to add context-specific refresh work.
	 * Called on initialization of special beans, before instantiation of singletons.
	 * <p>This implementation is empty.
	 * @throws BeansException in case of errors
	 * @see #refresh()
	 */
	protected void onRefresh() throws BeansException {
		// For subclasses: do nothing by default.
	}
我们进入AnnotationConfigServletWebServerApplicationContext的父类ServletWebServerApplicationContext,有重写这个方法:
@Override
	protected void onRefresh() {
		super.onRefresh();
		try {
			createWebServer();
		}
		catch (Throwable ex) {
			throw new ApplicationContextException("Unable to start web server", ex);
		}
	}
这里创建了内嵌的WebServer。
	private void createWebServer() {
		WebServer webServer = this.webServer;
		ServletContext servletContext = getServletContext();
		if (webServer == null && servletContext == null) {
			StartupStep createWebServer = getApplicationStartup().start("spring.boot.webserver.create");
			ServletWebServerFactory factory = getWebServerFactory();
			createWebServer.tag("factory", factory.getClass().toString());
                            //创建WebServer
			this.webServer = factory.getWebServer(getSelfInitializer());
			createWebServer.end();
			getBeanFactory().registerSingleton("webServerGracefulShutdown",
					new WebServerGracefulShutdownLifecycle(this.webServer));
			getBeanFactory().registerSingleton("webServerStartStop",
					new WebServerStartStopLifecycle(this, this.webServer));
		}
		else if (servletContext != null) {
			try {
				getSelfInitializer().onStartup(servletContext);
			}
			catch (ServletException ex) {
				throw new ApplicationContextException("Cannot initialize servlet context", ex);
			}
		}
		initPropertySources();
	}
框架提供的Sever类型有JettyWebServer、NettyWebServer、TomcatWebServer、UndertowServletWebServer、UndertowWebServer,示例工程的Server是TomcatWebServer。
6.2 特别点2:invokeBeanFactoryPostProcessors方法
这个方法invokeBeanFactoryPostProcessors笔者提及到多次了,方法内使用BeanDefinitionRegistryPostProcessor(ConfigurationClassPostProcessor)完成了注解配置Bean的解析和注册。
	/**
	 * Build and validate a configuration model based on the registry of
	 * {@link Configuration} classes.
	 */
	public void processConfigBeanDefinitions(BeanDefinitionRegistry registry) {
		List<BeanDefinitionHolder> configCandidates = new ArrayList<>();
		String[] candidateNames = registry.getBeanDefinitionNames();

		for (String beanName : candidateNames) {
			BeanDefinition beanDef = registry.getBeanDefinition(beanName);
			if (beanDef.getAttribute(ConfigurationClassUtils.CONFIGURATION_CLASS_ATTRIBUTE) != null) {
				if (logger.isDebugEnabled()) {
					logger.debug("Bean definition has already been processed as a configuration class: " + beanDef);
				}
			}
			else if (ConfigurationClassUtils.checkConfigurationClassCandidate(beanDef, this.metadataReaderFactory)) {
				configCandidates.add(new BeanDefinitionHolder(beanDef, beanName));
			}
		}

		// Return immediately if no @Configuration classes were found
		if (configCandidates.isEmpty()) {
			return;
		}

		// Sort by previously determined @Order value, if applicable
		configCandidates.sort((bd1, bd2) -> {
			int i1 = ConfigurationClassUtils.getOrder(bd1.getBeanDefinition());
			int i2 = ConfigurationClassUtils.getOrder(bd2.getBeanDefinition());
			return Integer.compare(i1, i2);
		});

		// Detect any custom bean name generation strategy supplied through the enclosing application context
		SingletonBeanRegistry sbr = null;
		if (registry instanceof SingletonBeanRegistry _sbr) {
			sbr = _sbr;
			if (!this.localBeanNameGeneratorSet) {
				BeanNameGenerator generator = (BeanNameGenerator) sbr.getSingleton(
						AnnotationConfigUtils.CONFIGURATION_BEAN_NAME_GENERATOR);
				if (generator != null) {
					this.componentScanBeanNameGenerator = generator;
					this.importBeanNameGenerator = generator;
				}
			}
		}

		if (this.environment == null) {
			this.environment = new StandardEnvironment();
		}

		// Parse each @Configuration class
		ConfigurationClassParser parser = new ConfigurationClassParser(
				this.metadataReaderFactory, this.problemReporter, this.environment,
				this.resourceLoader, this.componentScanBeanNameGenerator, registry);
                                //配置类候选集,在上面checkConfigurationClassCandidate通过@Configuration注解去判断,@SpringBootApplication内含了@Configuration注解
		Set<BeanDefinitionHolder> candidates = new LinkedHashSet<>(configCandidates);
		Set<ConfigurationClass> alreadyParsed = new HashSet<>(configCandidates.size());
		do {
			StartupStep processConfig = this.applicationStartup.start("spring.context.config-classes.parse");
                                //注意这行代码。从一个配置类解析相关的所有Bean信息。
			parser.parse(candidates);
			parser.validate();

			Set<ConfigurationClass> configClasses = new LinkedHashSet<>(parser.getConfigurationClasses());
			configClasses.removeAll(alreadyParsed);

			// Read the model and create bean definitions based on its content
			if (this.reader == null) {
				this.reader = new ConfigurationClassBeanDefinitionReader(
						registry, this.sourceExtractor, this.resourceLoader, this.environment,
						this.importBeanNameGenerator, parser.getImportRegistry());
			}
			this.reader.loadBeanDefinitions(configClasses);
			alreadyParsed.addAll(configClasses);
			processConfig.tag("classCount", () -> String.valueOf(configClasses.size())).end();

			candidates.clear();
			if (registry.getBeanDefinitionCount() > candidateNames.length) {
				String[] newCandidateNames = registry.getBeanDefinitionNames();
				Set<String> oldCandidateNames = Set.of(candidateNames);
				Set<String> alreadyParsedClasses = new HashSet<>();
				for (ConfigurationClass configurationClass : alreadyParsed) {
					alreadyParsedClasses.add(configurationClass.getMetadata().getClassName());
				}
				for (String candidateName : newCandidateNames) {
					if (!oldCandidateNames.contains(candidateName)) {
						BeanDefinition bd = registry.getBeanDefinition(candidateName);
						if (ConfigurationClassUtils.checkConfigurationClassCandidate(bd, this.metadataReaderFactory) &&
								!alreadyParsedClasses.contains(bd.getBeanClassName())) {
							candidates.add(new BeanDefinitionHolder(bd, candidateName));
						}
					}
				}
				candidateNames = newCandidateNames;
			}
		}
		while (!candidates.isEmpty());

		// Register the ImportRegistry as a bean in order to support ImportAware @Configuration classes
		if (sbr != null && !sbr.containsSingleton(IMPORT_REGISTRY_BEAN_NAME)) {
			sbr.registerSingleton(IMPORT_REGISTRY_BEAN_NAME, parser.getImportRegistry());
		}

		// Store the PropertySourceDescriptors to contribute them Ahead-of-time if necessary
		this.propertySourceDescriptors = parser.getPropertySourceDescriptors();

		if (this.metadataReaderFactory instanceof CachingMetadataReaderFactory cachingMetadataReaderFactory) {
			// Clear cache in externally provided MetadataReaderFactory; this is a no-op
			// for a shared cache since it'll be cleared by the ApplicationContext.
			cachingMetadataReaderFactory.clearCache();
		}
	}
然后来到这个方法,这里解析了各种注解引入的Bean信息,也包含ComponentScan路径扫描的:
	/**
	 * Apply processing and build a complete {@link ConfigurationClass} by reading the
	 * annotations, members and methods from the source class. This method can be called
	 * multiple times as relevant sources are discovered.
	 * @param configClass the configuration class being build
	 * @param sourceClass a source class
	 * @return the superclass, or {@code null} if none found or previously processed
	 */
	@Nullable
	protected final SourceClass doProcessConfigurationClass(
			ConfigurationClass configClass, SourceClass sourceClass, Predicate<String> filter)
			throws IOException {

		if (configClass.getMetadata().isAnnotated(Component.class.getName())) {
			// Recursively process any member (nested) classes first
			processMemberClasses(configClass, sourceClass, filter);
		}

		// Process any @PropertySource annotations
		for (AnnotationAttributes propertySource : AnnotationConfigUtils.attributesForRepeatable(
				sourceClass.getMetadata(), PropertySources.class,
				org.springframework.context.annotation.PropertySource.class)) {
			if (this.propertySourceRegistry != null) {
				this.propertySourceRegistry.processPropertySource(propertySource);
			}
			else {
				logger.info("Ignoring @PropertySource annotation on [" + sourceClass.getMetadata().getClassName() +
						"]. Reason: Environment must implement ConfigurableEnvironment");
			}
		}

		// Process any @ComponentScan annotations
		Set<AnnotationAttributes> componentScans = AnnotationConfigUtils.attributesForRepeatable(
				sourceClass.getMetadata(), ComponentScans.class, ComponentScan.class);
		if (!componentScans.isEmpty() &&
				!this.conditionEvaluator.shouldSkip(sourceClass.getMetadata(), ConfigurationPhase.REGISTER_BEAN)) {
			for (AnnotationAttributes componentScan : componentScans) {
				// The config class is annotated with @ComponentScan -> perform the scan immediately
				Set<BeanDefinitionHolder> scannedBeanDefinitions =
						this.componentScanParser.parse(componentScan, sourceClass.getMetadata().getClassName());
				// Check the set of scanned definitions for any further config classes and parse recursively if needed
				for (BeanDefinitionHolder holder : scannedBeanDefinitions) {
					BeanDefinition bdCand = holder.getBeanDefinition().getOriginatingBeanDefinition();
					if (bdCand == null) {
						bdCand = holder.getBeanDefinition();
					}
					if (ConfigurationClassUtils.checkConfigurationClassCandidate(bdCand, this.metadataReaderFactory)) {
						parse(bdCand.getBeanClassName(), holder.getBeanName());
					}
				}
			}
		}

		// Process any @Import annotations
		processImports(configClass, sourceClass, getImports(sourceClass), filter, true);

		// Process any @ImportResource annotations
		AnnotationAttributes importResource =
				AnnotationConfigUtils.attributesFor(sourceClass.getMetadata(), ImportResource.class);
		if (importResource != null) {
			String[] resources = importResource.getStringArray("locations");
			Class<? extends BeanDefinitionReader> readerClass = importResource.getClass("reader");
			for (String resource : resources) {
				String resolvedResource = this.environment.resolveRequiredPlaceholders(resource);
				configClass.addImportedResource(resolvedResource, readerClass);
			}
		}

		// Process individual @Bean methods
		Set<MethodMetadata> beanMethods = retrieveBeanMethodMetadata(sourceClass);
		for (MethodMetadata methodMetadata : beanMethods) {
			configClass.addBeanMethod(new BeanMethod(methodMetadata, configClass));
		}

		// Process default methods on interfaces
		processInterfaces(configClass, sourceClass);

		// Process superclass, if any
		if (sourceClass.getMetadata().hasSuperClass()) {
			String superclass = sourceClass.getMetadata().getSuperClassName();
			if (superclass != null && !superclass.startsWith("java") &&
					!this.knownSuperclasses.containsKey(superclass)) {
				this.knownSuperclasses.put(superclass, configClass);
				// Superclass found, return its annotation metadata and recurse
				return sourceClass.getSuperClass();
			}
		}

		// No superclass -> processing is complete
		return null;
	}
7.afterRefresh钩子方法
afterRefresh方法是一个空方法,作为拓展点。
	/**
	 * Called after the context has been refreshed.
	 * @param context the application context
	 * @param args the application arguments
	 */
	protected void afterRefresh(ConfigurableApplicationContext context, ApplicationArguments args) {
	}
8.started监听事件
这里是发布监听事件,执行监听器对应的监听方法。
void started(ConfigurableApplicationContext context, Duration timeTaken) {
		doWithListeners("spring.boot.application.started", (listener) -> listener.started(context, timeTaken));
	}
9.执行runners
执行注册过的runner,有ApplicationRunner、CommandLineRunner两类。
private void callRunners(ApplicationContext context, ApplicationArguments args) {
		List<Object> runners = new ArrayList<>();
		runners.addAll(context.getBeansOfType(ApplicationRunner.class).values());
		runners.addAll(context.getBeansOfType(CommandLineRunner.class).values());
		AnnotationAwareOrderComparator.sort(runners);
		for (Object runner : new LinkedHashSet<>(runners)) {
			if (runner instanceof ApplicationRunner applicationRunner) {
				callRunner(applicationRunner, args);
			}
			if (runner instanceof CommandLineRunner commandLineRunner) {
				callRunner(commandLineRunner, args);
			}
		}
	}
至此,启动流程基本分析一遍,要重关注spring.factories这里面的工厂类注册信息和作用、SpringBoot的ApplicationContext对基本ApplicationContext的拓展,以及refresh刷新容器的方法。
四、参考材料
1.《Spring Boot Reference Documentation》(version 3.1.5)
2.SpringBoot源码(版本3.1.3)