
本文是Spring源码阅读计划的第十四篇文章,本文主要简单介绍一下Spring MVC的概念,重点介绍DispatcherServlet的初始化过程。
本文源码地址为:https://github.com/zouhuanli/SpringMvcDemo.git.
一、SpringMVC基础
1.什么是SpringMVC?
Spring MVC是Spring提供的轻量级的MVC框架,M-模型model,V-视图view,C-控制器controller。SpringMVC是基于servlet的轻量级的MVC框架,主要用于简化Java
Web应用的开发。
SpringMVC对应的组件分别是:Model主要指Service和DAO,主要功能是数据操作。
Controller主要指DispatcherServlet和controller,主要功能是流程控制。
View主要指JSP、FreeMaker等视图技术,主要功能是视图展示。
SpringMVC的源码模块主要是spring-webmvc,和spring-web。spring-web提供了处理web请求的更高层次的抽象,由Servlet栈的spring-webmvc和Reactive栈的spring-webflux引用。
spring-webmvc的一个核心类就是DispatcherServlet,通常翻译为前端控制器。DispatcherServlet实现了servlet接口,servlet接口的service接口最终在DispatcherServlet的doDispatch方法。
2.DispatcherServlet和ApplicationContext
DispatcherServlet是核心的前端控制器,主要用于Http请求分派。其类关系图如下:
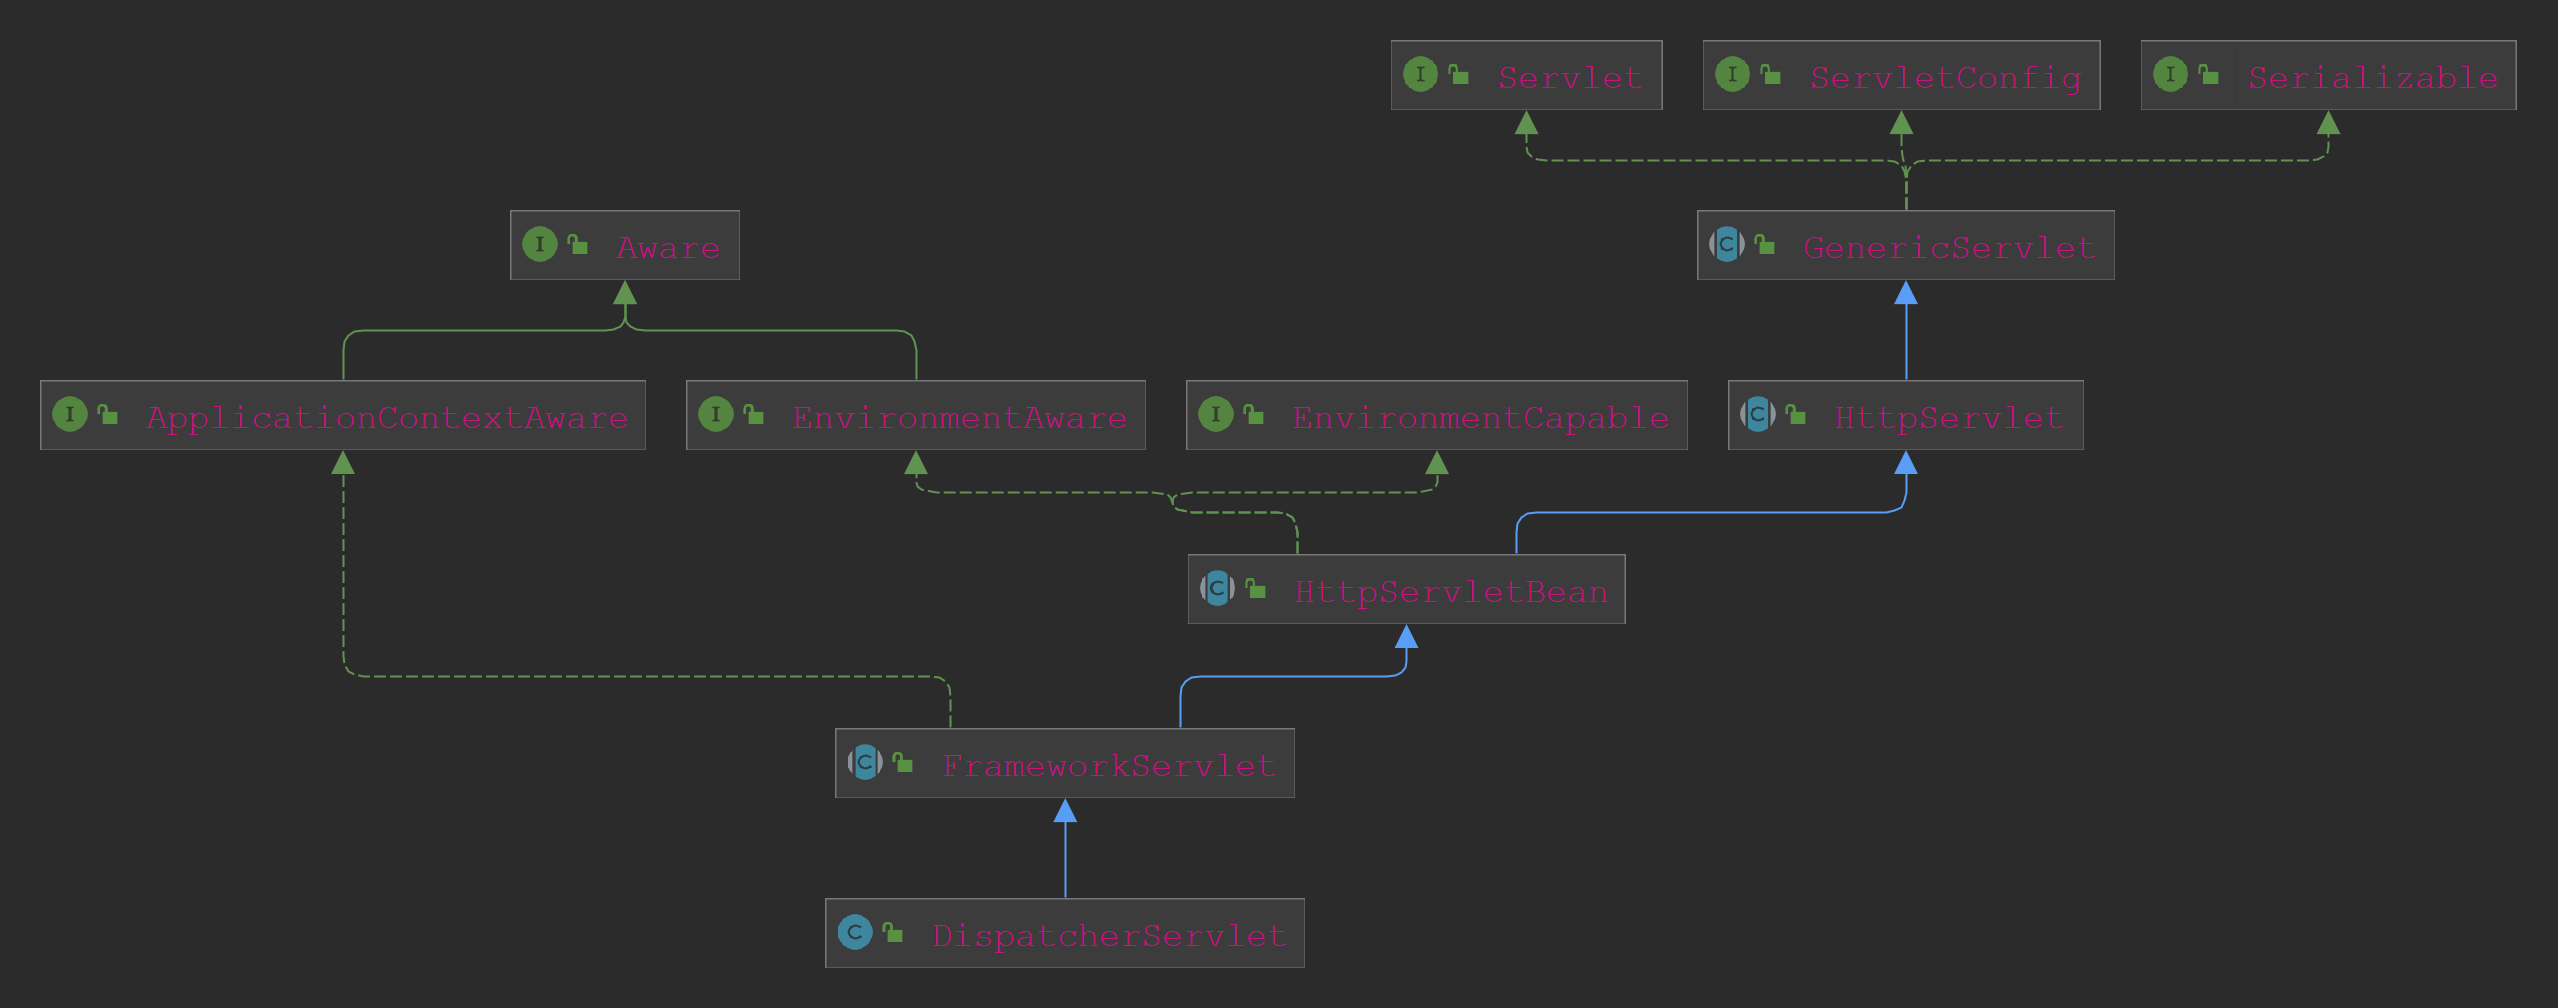
可以看到其顶层接口是Aware和Servlet。
DispatcherServlet和ApplicationContext我们可以看一下官网的这个图片。
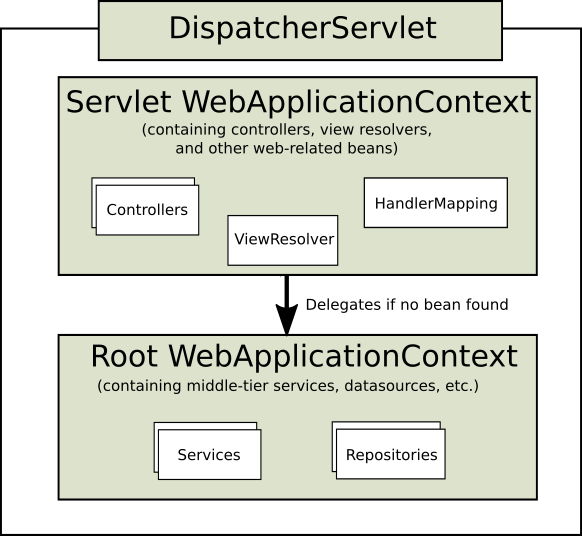
可以看到DispatcherServlet的Context主要是初始化web相关的bean,如Controller、Resolver、handleMapping等。
而RootWebApplicationContext主要是初始化基础Bean,如Service、DAO等,以及其他非web层的组件。
二、SpringMVC的简单示例
这里从一个简单的例子演示SpringMVC的使用。
实体类:
package com.homura.entity;

import lombok.Data;

import java.io.Serializable;

/**
 * entity
 * @author zouhl
 */
@Data
public class User implements Serializable {
    /**
     * 用户ID
     */
    private Integer uid;
    /**
     * 用户姓名
     */
    private String uname;
    /**
     * 密码
     */
    private String password;
    /**
     * 性别
     */
    private String gender;
    /**
     * 手机号码
     */
    private String phone;
    /**
     * 邮件
     */
    private String email;
    /**
     * 地址
     */
    private String address;
}
DAO接口:
@Repository
public interface UserMapper {
    /**
     * 查找全部用户
     *
     * @return
     */
    @Select("select * from user")
    @ResultMap("BaseResultMap")
    List<User> findUserList();

}
Service(接口或实现类):
@Service
public class UserServiceImpl {
    @Autowired
    private UserMapper userDao;

    /**
     * 查找用户列表
     *
     * @return
     */
    public List<User> findUserList() throws Exception {
        return userDao.findUserList();
    }
}
controller类:
@RequestMapping("/user")
@Controller
public class UserController {
    private static final Logger LOGGER = LoggerFactory.getLogger(UserController.class);
    @Autowired
    private UserServiceImpl userService;

    /**
     * 查询所有的用户列表
     *
     * @param request
     * @param response
     * @return
     * @throws Exception
     */
    @RequestMapping("/userList")
    public ModelAndView list(HttpServletRequest request, HttpServletResponse response) throws Exception {
        ModelAndView modelAndView = new ModelAndView();
        modelAndView.addObject("dateTime", LocalDateTime.now());
        modelAndView.addObject("userList", userService.findUserList());
        modelAndView.setViewName("userList");
        return modelAndView;
    }

    /**
     * 返回Json数据示例
     *
     * @param requestBody
     * @param request
     * @param response
     * @return
     */
    @RequestMapping(value = "/hello", method = RequestMethod.POST, produces = MediaType.APPLICATION_JSON_VALUE)
    @ResponseBody
    public ResponseEntity<String> hello(@RequestBody String requestBody, HttpServletRequest request, HttpServletResponse response) {
        LOGGER.info("receive requestBody:{} ", requestBody);
        String responseJson = "{\"userName\":\"张三\",\"age\":18}";
        return new ResponseEntity<>(responseJson, HttpStatus.OK);
    }


}
db和mybatis配置:
<?xml version="1.0" encoding="UTF-8"?>
<beans xmlns="http://www.springframework.org/schema/beans"
       xmlns:xsi="http://www.w3.org/2001/XMLSchema-instance"
       xmlns:tx="http://www.springframework.org/schema/tx"
       xsi:schemaLocation="http://www.springframework.org/schema/beans
        http://www.springframework.org/schema/beans/spring-beans.xsd


        http://www.springframework.org/schema/tx
        http://www.springframework.org/schema/tx/spring-tx.xsd">

    <bean id="dataSource" class="com.zaxxer.hikari.HikariDataSource" destroy-method="close">
        <property name="driverClassName" value="${db.driver}"/>
        <property name="jdbcUrl" value="${db.url}"/>
        <property name="username" value="${db.username}"/>
        <property name="password" value="${db.password}"/>
        <property name="connectionTestQuery" value="${db.connectionTestQuery}"/>
        <!-- 生效超时 -->
        <property name="validationTimeout" value="${db.validationTimeout}"/>
        <!-- 连接只读数据库时配置为true, 保证安全 -->
        <property name="readOnly" value="${db.readOnly}"/>
        <!-- 等待连接池分配连接的最大时长(毫秒),超过这个时长还没可用的连接则发生SQLException, 缺省:30秒 -->
        <property name="connectionTimeout" value="${db.connectionTimeout}"/>
        <!-- 一个连接idle状态的最大时长(毫秒),超时则被释放(retired),缺省:10分钟 -->
        <property name="idleTimeout" value="${db.idleTimeout}"/>
        <!-- 一个连接的生命时长(毫秒),超时而且没被使用则被释放(retired),缺省:30分钟,建议设置比数据库超时时长少30秒,参考MySQL
            wait_timeout参数(show variables like '%timeout%';) -->
        <property name="maxLifetime" value="${db.maxLifetime}"/>
        <!-- 连接池中允许的最大连接数。缺省值:10;推荐的公式:((core_count * 2) + effective_spindle_count) -->
        <property name="maximumPoolSize" value="${db.maximumPoolSize}"/>
    </bean>
    <bean id="sqlSessionFactory" class="org.mybatis.spring.SqlSessionFactoryBean">
        <property name="dataSource" ref="dataSource"/>
        <property name="configLocation" value="classpath:mybatis-config.xml"/>
        <property name="mapperLocations" value="classpath:mappers/*.xml"/>
    </bean>
    <bean id="mapperScanner" class="org.mybatis.spring.mapper.MapperScannerConfigurer">
        <description>DAO接口所在包,自动扫描</description>
        <property name="basePackage" value="com.homura.dao"/>
        <property name="sqlSessionFactoryBeanName" value="sqlSessionFactory"/>
    </bean>
    <bean id="sqlSession" class="org.mybatis.spring.SqlSessionTemplate">
        <constructor-arg index="0" ref="sqlSessionFactory"/>
    </bean>
    <bean id="transactionManager" class="org.springframework.jdbc.datasource.DataSourceTransactionManager">
        <property name="dataSource" ref="dataSource"/>
    </bean>
    <tx:annotation-driven transaction-manager="transactionManager" proxy-target-class="true"/>
</beans>
数据库连接配置:
db.driver=com.mysql.cj.jdbc.Driver
db.url=jdbc:mysql://localhost:3306/sakila?useSSH=true&useUnicode=true&characterEncoding=UTF-8
db.username=sakila
db.password=sakila
db.connectionTestQuery=SELECT 1
db.validationTimeout=3000
db.readOnly=false
db.connectionTimeout=60000
db.idleTimeout=60000
db.maxLifetime=60000
db.maximumPoolSize=10
使用maven编译打包,下载安装配置好tomcat。执行测试。 这里使用IDEA自带的HttpClient进行测试。 测试userList方法。如下。
GET http://localhost:8080/springmvcdemo_war/user/userList

HTTP/1.1 200
Set-Cookie: JSESSIONID=5FFE64E9A092CAACA2F90C74C2FD3A69; Path=/springmvcdemo_war; HttpOnly
Content-Type: text/html;charset=UTF-8
Content-Language: zh-CN
Content-Length: 2386
Date: Thu, 12 Oct 2023 15:31:23 GMT
Keep-Alive: timeout=20
Connection: keep-alive

<html lang="zh-CN">
<head>
    <meta charset="utf-8">
    <meta http-equiv="X-UA-Compatible" content="IE=edge">
    <meta name="viewport" content="width=device-width, initial-scale=1">

    <title>User List</title>

    <!-- Bootstrap -->
    <link rel="stylesheet" href="//cdn.bootcss.com/bootstrap/3.3.5/css/bootstrap.min.css">

</head>
<body>
<div class="container">

    <table class="table table-bordered table-striped">
        <tr>
            <th>id</th>
            <th>name</th>
            <th>phone</th>
        </tr>

        <tr>
            <td>3</td>
            <td>bb</td>
            <td></td>
        </tr>

        <tr>
            <td>7</td>
            <td>L</td>
            <td>12345678900</td>
        </tr>

        <tr>
            <td>8</td>
            <td>123</td>
            <td>321</td>
        </tr>

        <tr>
            <td>11</td>
            <td></td>
            <td></td>
        </tr>

        <tr>
            <td>12</td>
            <td>111</td>
            <td></td>
        </tr>

        <tr>
            <td>13</td>
            <td>333</td>
            <td></td>
        </tr>

        <tr>
            <td>14</td>
            <td>666</td>
            <td></td>
        </tr>

        <tr>
            <td>15</td>
            <td>777</td>
            <td></td>
        </tr>

        <tr>
            <td>16</td>
            <td>16</td>
            <td>1340</td>
        </tr>

        <tr>
            <td>17</td>
            <td>17</td>
            <td>111</td>
        </tr>

        <tr>
            <td>18</td>
            <td>19</td>
            <td>222</td>
        </tr>

    </table>

</div>
</body>
</html>

Response file saved.
> 2023-10-12T233123.200.html

Response code: 200; Time: 443ms (443 ms); Content length: 2386 bytes (2.39 kB)
再执行hello方法测试,如下。
POST http://localhost:8080/springmvcdemo_war/user/hello
content-type: application/json
charset: utf-8
Content-Length: 51
Connection: Keep-Alive
User-Agent: Apache-HttpClient/4.5.14 (Java/17.0.8)
Cookie: JSESSIONID=5FFE64E9A092CAACA2F90C74C2FD3A69
Accept-Encoding: br,deflate,gzip,x-gzip

{
  "name": "李四",
  "age": 19,
  "id": "1111"
}

HTTP/1.1 200
Content-Type: application/json;charset=UTF-8
Content-Length: 30
Date: Thu, 12 Oct 2023 15:36:18 GMT
Keep-Alive: timeout=20
Connection: keep-alive

{
  "userName": "张三",
  "age": 18
}
Response file saved.
> 2023-10-12T233618.200.json

Response code: 200; Time: 3ms (3 ms); Content length: 26 bytes (26 B)
三、DispatcherServlet的初始化流程
DispatcherServlet的初始化流程是此篇文章的主要内容。
在tomcat的StandardWrapper的loadServlet()方法中,有如下代码:
    /**
     * Load and initialize an instance of this servlet, if there is not already an initialized instance. This can be
     * used, for example, to load servlets that are marked in the deployment descriptor to be loaded at server startup
     * time.
     *
     * @return the loaded Servlet instance
     *
     * @throws ServletException for a Servlet load error
     */
    public synchronized Servlet loadServlet() throws ServletException {


        Servlet servlet;
        try {

            InstanceManager instanceManager = ((StandardContext) getParent()).getInstanceManager();
            try {
                //实例化Servlet
                servlet = (Servlet) instanceManager.newInstance(servletClass);
            }
            // Special handling for ContainerServlet instances
            // Note: The InstanceManager checks if the application is permitted
            // to load ContainerServlets
            if (servlet instanceof ContainerServlet) {
                ((ContainerServlet) servlet).setWrapper(this);
            }

          //初始化Servlet
            initServlet(servlet);

            fireContainerEvent("load", this);

        }
        return servlet;

    }
initServlet(servlet)这行代码开始初始化Servlet,我们从Servlet的init方法作为入口开始研读源码。我们从Servlet—>GenericServlet—>HttpServlet —->HttpServletBean—>FrameworkServlet—>DispatcherServlet这样的顺序阅读init方法的源码。
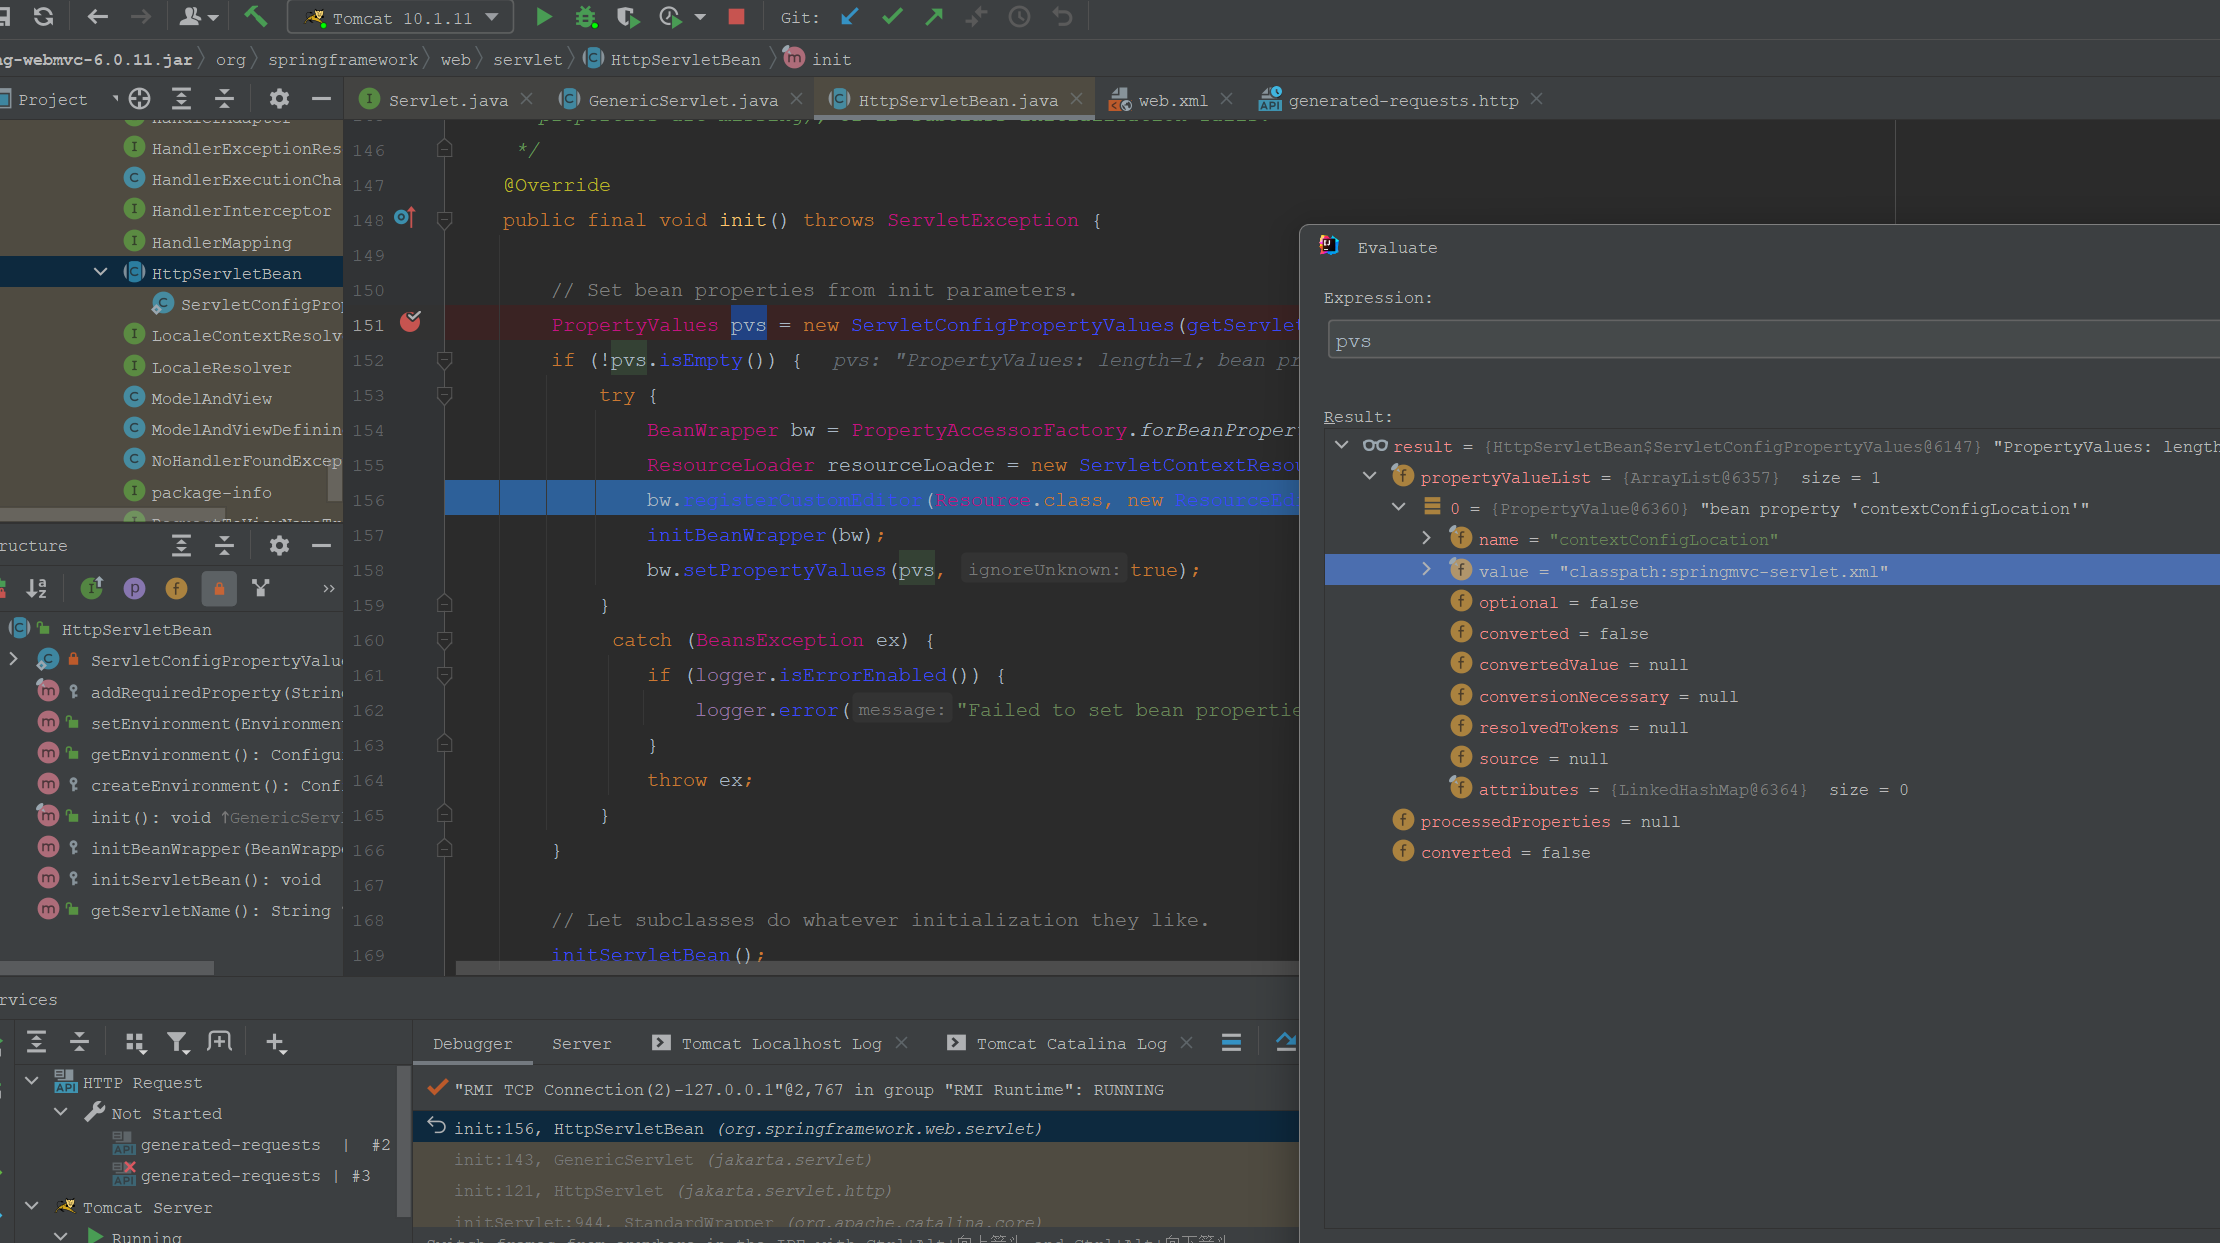
HttpServletBean的init方法如下。
@Override
	public final void init() throws ServletException {

		// Set bean properties from init parameters.
		PropertyValues pvs = new ServletConfigPropertyValues(getServletConfig(), this.requiredProperties);
		if (!pvs.isEmpty()) {
			try {
				BeanWrapper bw = PropertyAccessorFactory.forBeanPropertyAccess(this);
				ResourceLoader resourceLoader = new ServletContextResourceLoader(getServletContext());
				bw.registerCustomEditor(Resource.class, new ResourceEditor(resourceLoader, getEnvironment()));
				initBeanWrapper(bw);
				bw.setPropertyValues(pvs, true);
			}
			catch (BeansException ex) {
				if (logger.isErrorEnabled()) {
					logger.error("Failed to set bean properties on servlet '" + getServletName() + "'", ex);
				}
				throw ex;
			}
		}

		// Let subclasses do whatever initialization they like.
		initServletBean();
	}
这里解析了web.xml的配置信息。
继续跟踪源码,进入FrameworkServlet.initServletBean()方法:
    @Override
	protected final void initServletBean() throws ServletException {

		try {
			this.webApplicationContext = initWebApplicationContext();
			initFrameworkServlet();
		}


	}
然后是initWebApplicationContext()方法。
protected WebApplicationContext initWebApplicationContext() {
		WebApplicationContext rootContext =
				WebApplicationContextUtils.getWebApplicationContext(getServletContext());
		WebApplicationContext wac = null;

		if (this.webApplicationContext != null) {
			// A context instance was injected at construction time -> use it
			wac = this.webApplicationContext;
			if (wac instanceof ConfigurableWebApplicationContext cwac && !cwac.isActive()) {
				// The context has not yet been refreshed -> provide services such as
				// setting the parent context, setting the application context id, etc
				if (cwac.getParent() == null) {
					// The context instance was injected without an explicit parent -> set
					// the root application context (if any; may be null) as the parent
					cwac.setParent(rootContext);
				}
				configureAndRefreshWebApplicationContext(cwac);
			}
		}
		if (wac == null) {
			// No context instance was injected at construction time -> see if one
			// has been registered in the servlet context. If one exists, it is assumed
			// that the parent context (if any) has already been set and that the
			// user has performed any initialization such as setting the context id
			wac = findWebApplicationContext();
		}
		if (wac == null) {
			// No context instance is defined for this servlet -> create a local one
			wac = createWebApplicationContext(rootContext);
		}

		if (!this.refreshEventReceived) {
			// Either the context is not a ConfigurableApplicationContext with refresh
			// support or the context injected at construction time had already been
			// refreshed -> trigger initial onRefresh manually here.
			synchronized (this.onRefreshMonitor) {
                //刷新方法
				onRefresh(wac);
			}
		}

		if (this.publishContext) {
			// Publish the context as a servlet context attribute.
        //ServletContext中设置ApplicationContex引用
			String attrName = getServletContextAttributeName();
			getServletContext().setAttribute(attrName, wac);
		}

		return wac;
	}
继续阅读createWebApplicationContext():
protected WebApplicationContext createWebApplicationContext(@Nullable ApplicationContext parent) {
		Class<?> contextClass = getContextClass();
		if (!ConfigurableWebApplicationContext.class.isAssignableFrom(contextClass)) {
			throw new ApplicationContextException(
					"Fatal initialization error in servlet with name '" + getServletName() +
					"': custom WebApplicationContext class [" + contextClass.getName() +
					"] is not of type ConfigurableWebApplicationContext");
		}
        //创建ApplicationContext
		ConfigurableWebApplicationContext wac =
				(ConfigurableWebApplicationContext) BeanUtils.instantiateClass(contextClass);

		wac.setEnvironment(getEnvironment());
		wac.setParent(parent);
		String configLocation = getContextConfigLocation();
        //classpath:springmvc-servlet.xml
		if (configLocation != null) {
			wac.setConfigLocation(configLocation);
		}
        //配置ApplicationContext
		configureAndRefreshWebApplicationContext(wac);

		return wac;
	}
再阅读配置ApplicationContext方法,如下。
protected void configureAndRefreshWebApplicationContext(ConfigurableWebApplicationContext wac) {
		if (ObjectUtils.identityToString(wac).equals(wac.getId())) {
			// The application context id is still set to its original default value
			// -> assign a more useful id based on available information
			if (this.contextId != null) {
				wac.setId(this.contextId);
			}
			else {
				// Generate default id...
				wac.setId(ConfigurableWebApplicationContext.APPLICATION_CONTEXT_ID_PREFIX +
						ObjectUtils.getDisplayString(getServletContext().getContextPath()) + '/' + getServletName());
			}
		}
        //在ApplicationContext设置ServletContext和ServletConfig
		wac.setServletContext(getServletContext());
		wac.setServletConfig(getServletConfig());
		wac.setNamespace(getNamespace());
		wac.addApplicationListener(new SourceFilteringListener(wac, new ContextRefreshListener()));

		// The wac environment's #initPropertySources will be called in any case when the context
		// is refreshed; do it eagerly here to ensure servlet property sources are in place for
		// use in any post-processing or initialization that occurs below prior to #refresh
		ConfigurableEnvironment env = wac.getEnvironment();
		if (env instanceof ConfigurableWebEnvironment cwe) {
			cwe.initPropertySources(getServletContext(), getServletConfig());
		}
        //后置处理,目前是空方法,预留的拓展点
		postProcessWebApplicationContext(wac);
        //执行初始化器
		applyInitializers(wac);
        //刷新方法,就是IoC容器那些文章讲到的AbstractApplicationContext的刷新方法
		wac.refresh();
	}
回到FrameworkServlet,其方法initFrameworkServlet()是一个空方法作为预留的拓展点。
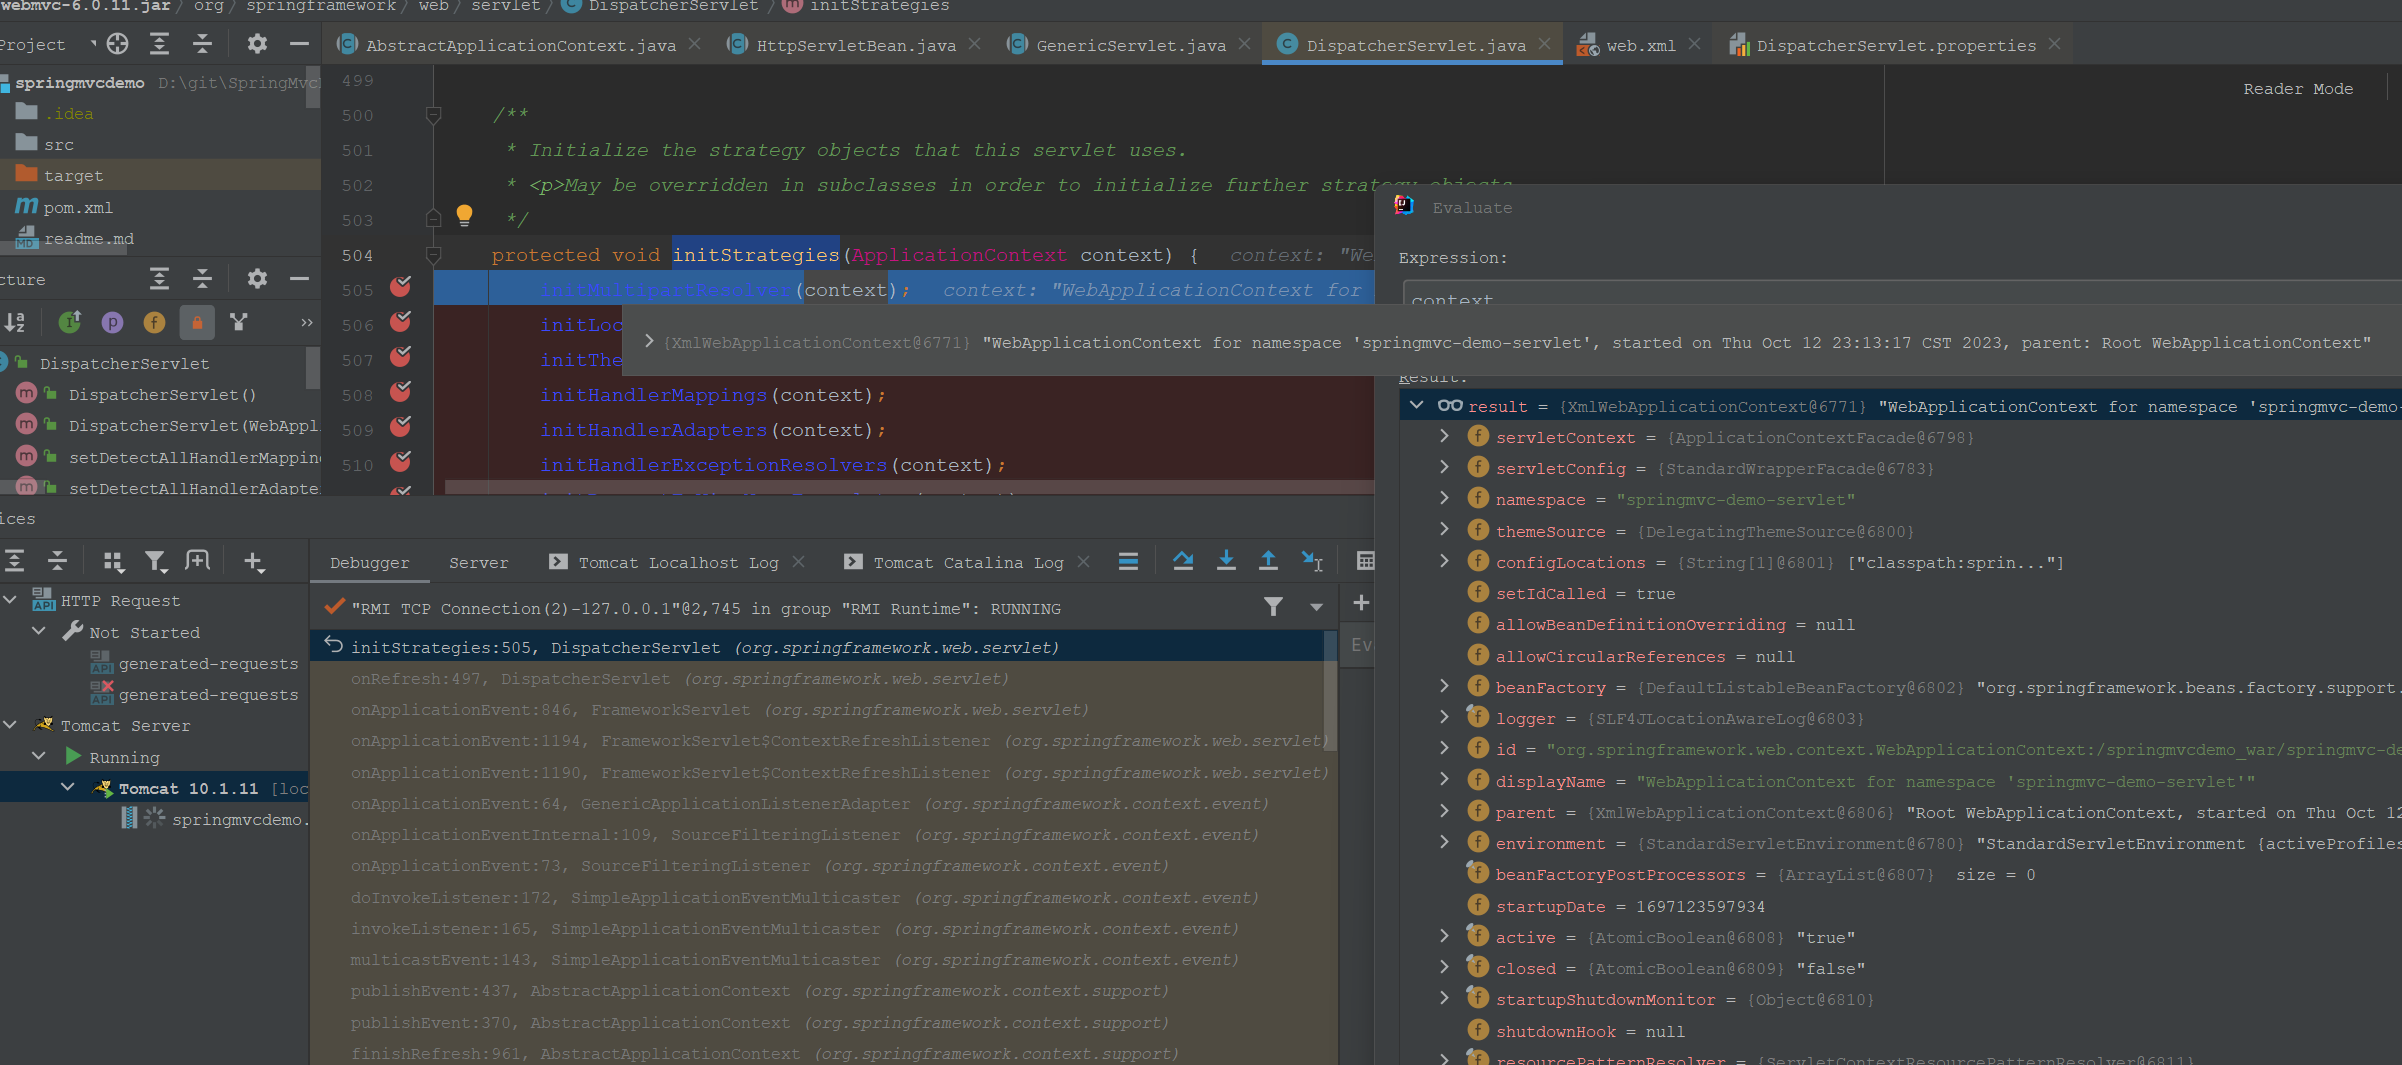
再看onRefresh方法,监听刷新事件的钩子方法。如下:
	@Override
	protected void onRefresh(ApplicationContext context) {
		initStrategies(context);
	}
刷新策略组,看名字应该使用了策略模式。
protected void initStrategies(ApplicationContext context) {
		initMultipartResolver(context);
		initLocaleResolver(context);
		initThemeResolver(context);
		initHandlerMappings(context);
		initHandlerAdapters(context);
		initHandlerExceptionResolvers(context);
		initRequestToViewNameTranslator(context);
		initViewResolvers(context);
		initFlashMapManager(context);
	}
这里初始化了所谓的九大组件:MultipartResolver、LocaleResolver、ThemeResolver、HandlerMapping、HandlerAdapter、HandlerExceptionResolver、RequestToViewNameTranslator、ViewResolver、FlashMapManager。 这里debug一下,看下组件的具体Type。
初始化后的实例:

初始化这些组件的默认类型在DispatcherServlet.properties文件里面。
# Default implementation classes for DispatcherServlet's strategy interfaces.
# Used as fallback when no matching beans are found in the DispatcherServlet context.
# Not meant to be customized by application developers.

org.springframework.web.servlet.LocaleResolver=org.springframework.web.servlet.i18n.AcceptHeaderLocaleResolver

org.springframework.web.servlet.ThemeResolver=org.springframework.web.servlet.theme.FixedThemeResolver

org.springframework.web.servlet.HandlerMapping=org.springframework.web.servlet.handler.BeanNameUrlHandlerMapping,\
	org.springframework.web.servlet.mvc.method.annotation.RequestMappingHandlerMapping,\
	org.springframework.web.servlet.function.support.RouterFunctionMapping

org.springframework.web.servlet.HandlerAdapter=org.springframework.web.servlet.mvc.HttpRequestHandlerAdapter,\
	org.springframework.web.servlet.mvc.SimpleControllerHandlerAdapter,\
	org.springframework.web.servlet.mvc.method.annotation.RequestMappingHandlerAdapter,\
	org.springframework.web.servlet.function.support.HandlerFunctionAdapter


org.springframework.web.servlet.HandlerExceptionResolver=org.springframework.web.servlet.mvc.method.annotation.ExceptionHandlerExceptionResolver,\
	org.springframework.web.servlet.mvc.annotation.ResponseStatusExceptionResolver,\
	org.springframework.web.servlet.mvc.support.DefaultHandlerExceptionResolver

org.springframework.web.servlet.RequestToViewNameTranslator=org.springframework.web.servlet.view.DefaultRequestToViewNameTranslator

org.springframework.web.servlet.ViewResolver=org.springframework.web.servlet.view.InternalResourceViewResolver

org.springframework.web.servlet.FlashMapManager=org.springframework.web.servlet.support.SessionFlashMapManager
到此,DispatcherServlet的初始化流程已完成。
四、SpringMVC的请求流程
SpringMVC的请求流程主要就是DispatcherServlet的doDispatch方法。
这里引用开涛老师的一张图,如下:
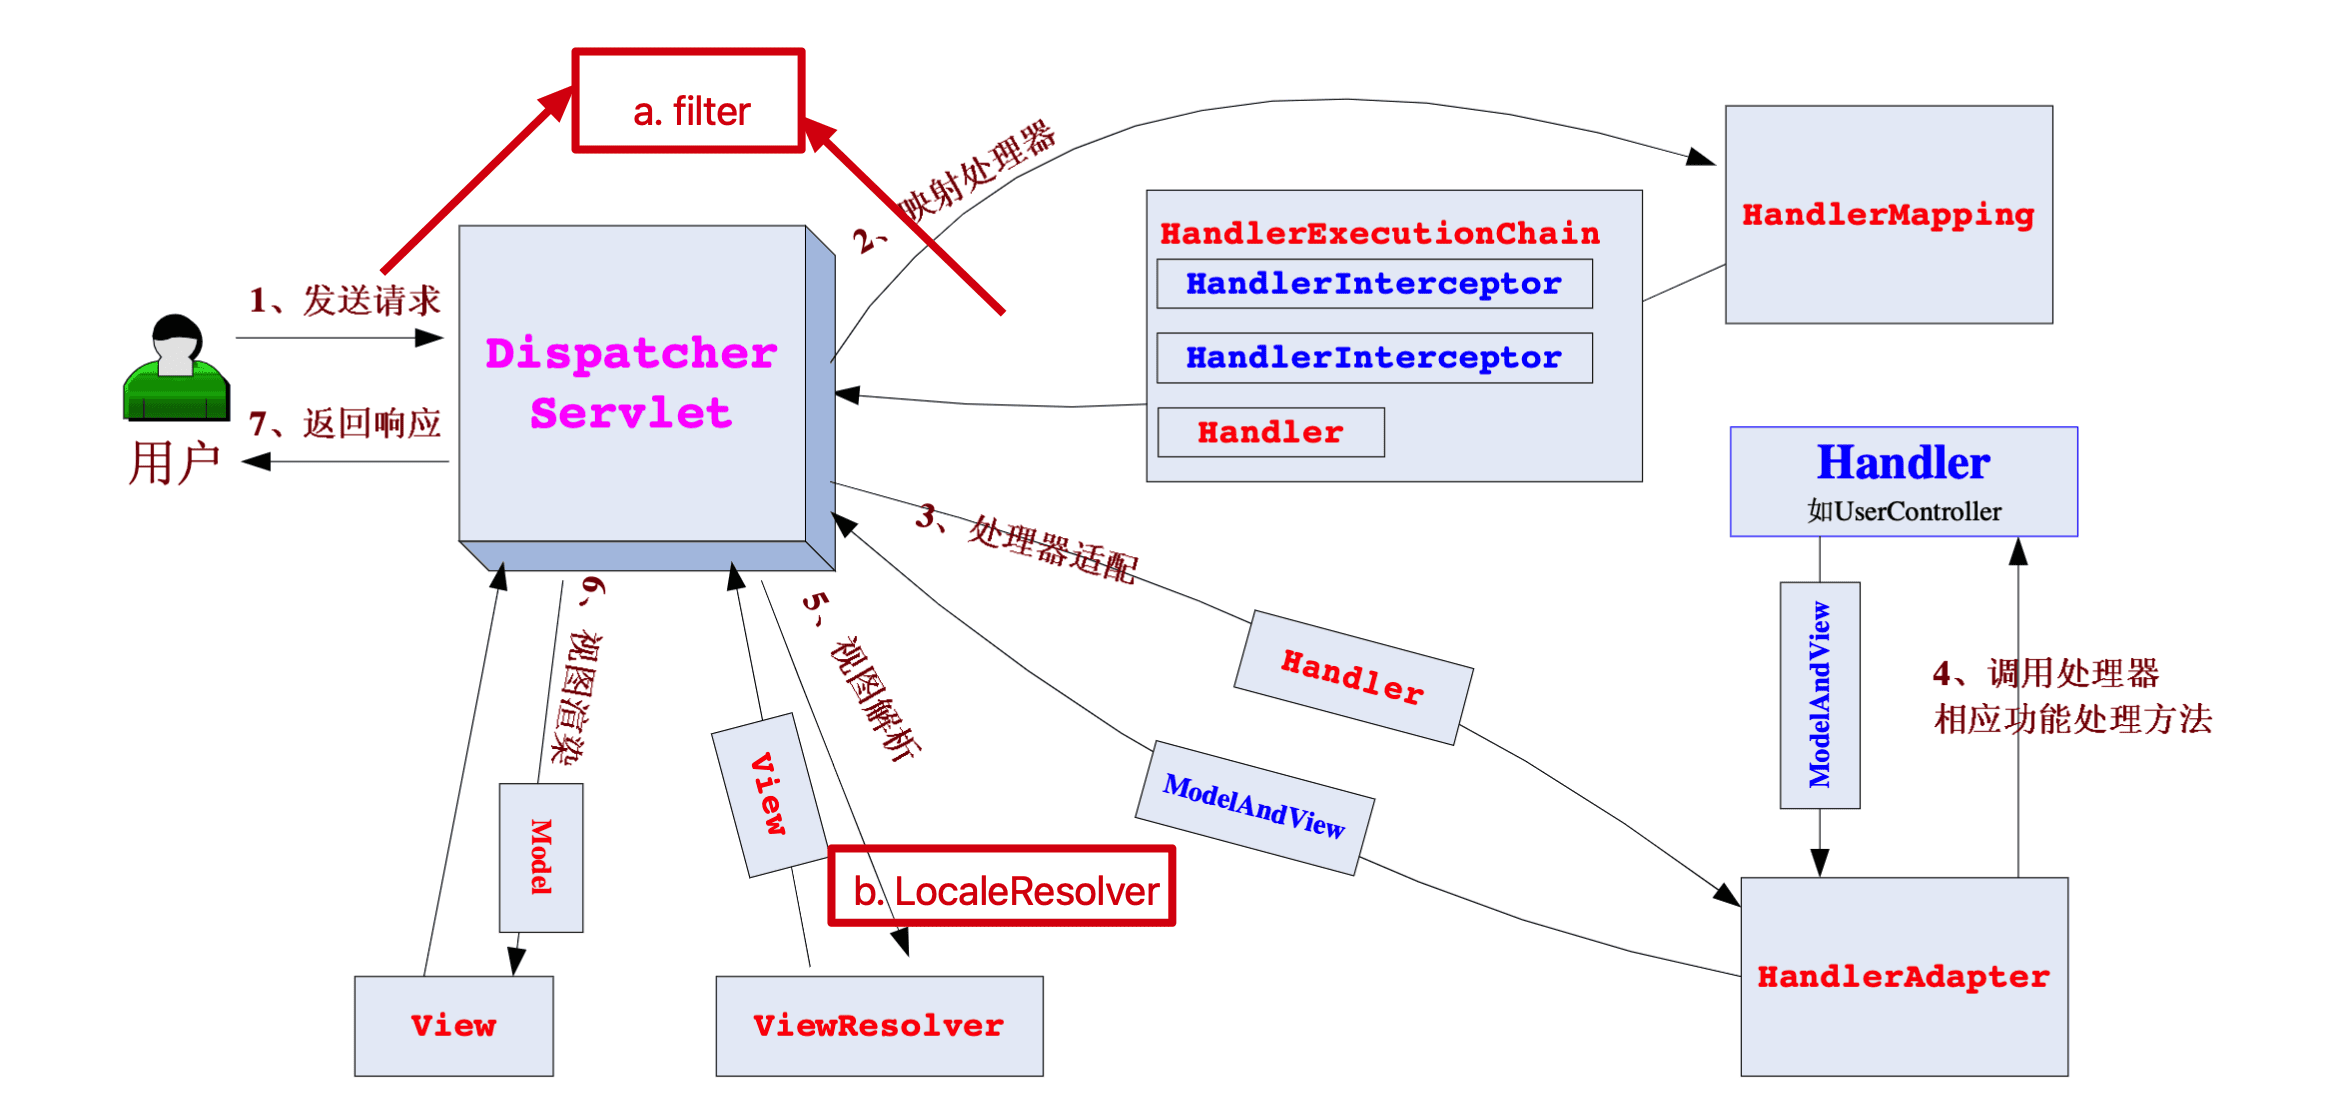
主要流程如下:
- 客户端(前端)发送请求到DispatcherServlet,DispatcherServlet请求handlerMapping,handlerMapping返回HandlerExecutionChain(包含handler/controller,和拦截器列表)。
- DispatcherServlet请求HandlerAdapter,HandlerAdapter请求handler/Controller。handler/Controller执行请求的方法,返回ModelAndView,或者不返回View只返回数据给response。
- DispatcherServlet请求ViewResolver,进行视图解析,得到View对象。
- DispatcherServlet将Model数据应用于View对象,进行视图渲染,返回前端数据。
笔者将在下一篇文章结合DispatcherServlet源码详细介绍请求流程。
五、参考材料
1.Spring源码(版本6.0.11)
2.《spring源码深度解析》(郝佳)
3.《Spring Framework Documentation》(Version 6.0.8)
4.http://jinnianshilongnian.iteye.com/